SellPro Features: Events
Everything you need to know about setting up and hosting Live and Virtual Events through SellPro.
EVENT CREATION
- To create new event, click the following link to access OMS, using your current SellPro user name and password: https://secure.sellpro.net/
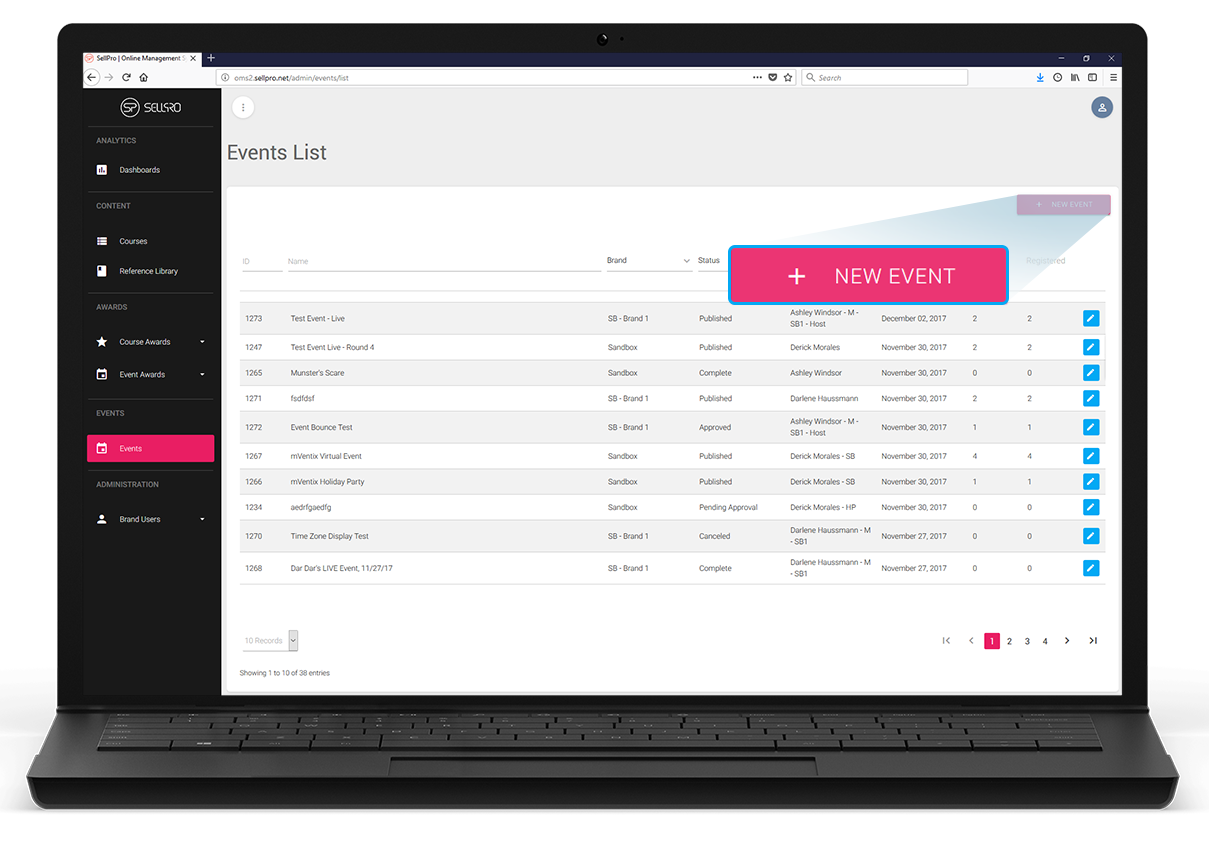
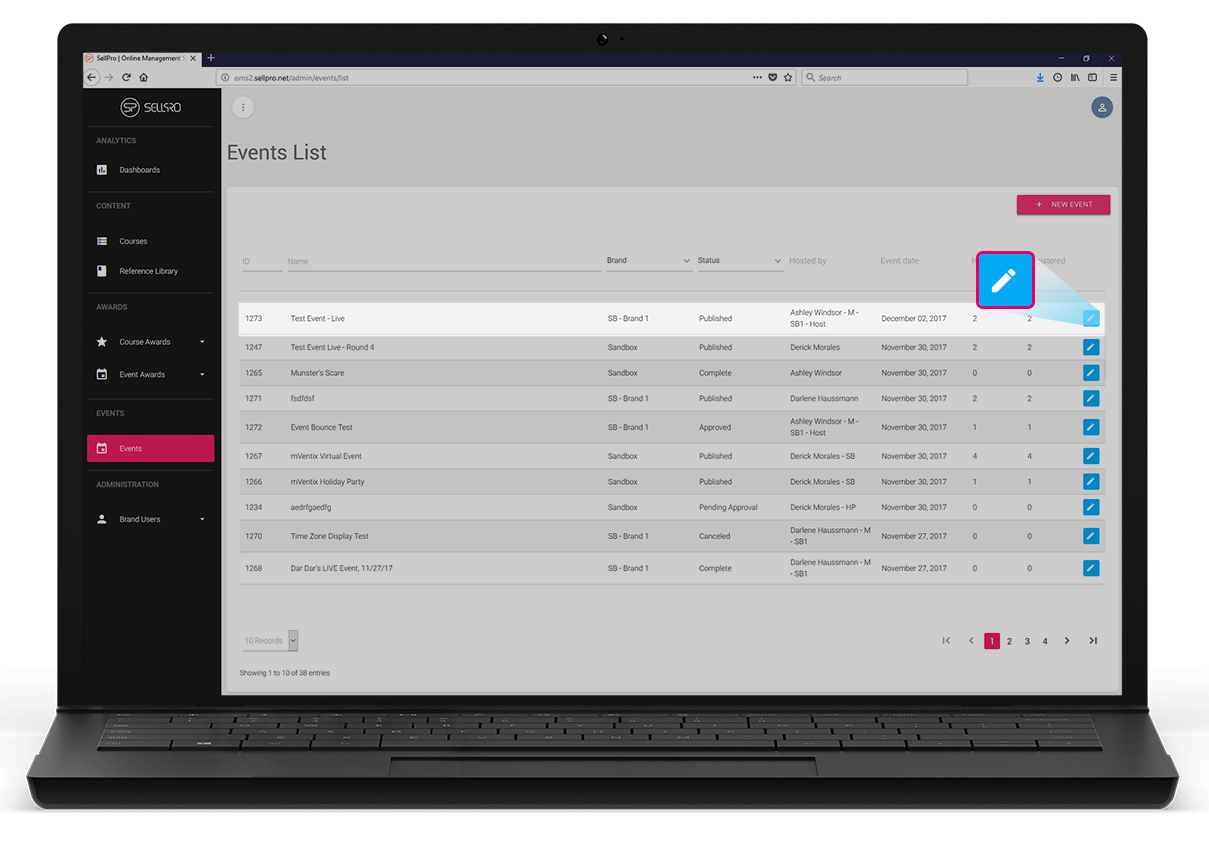
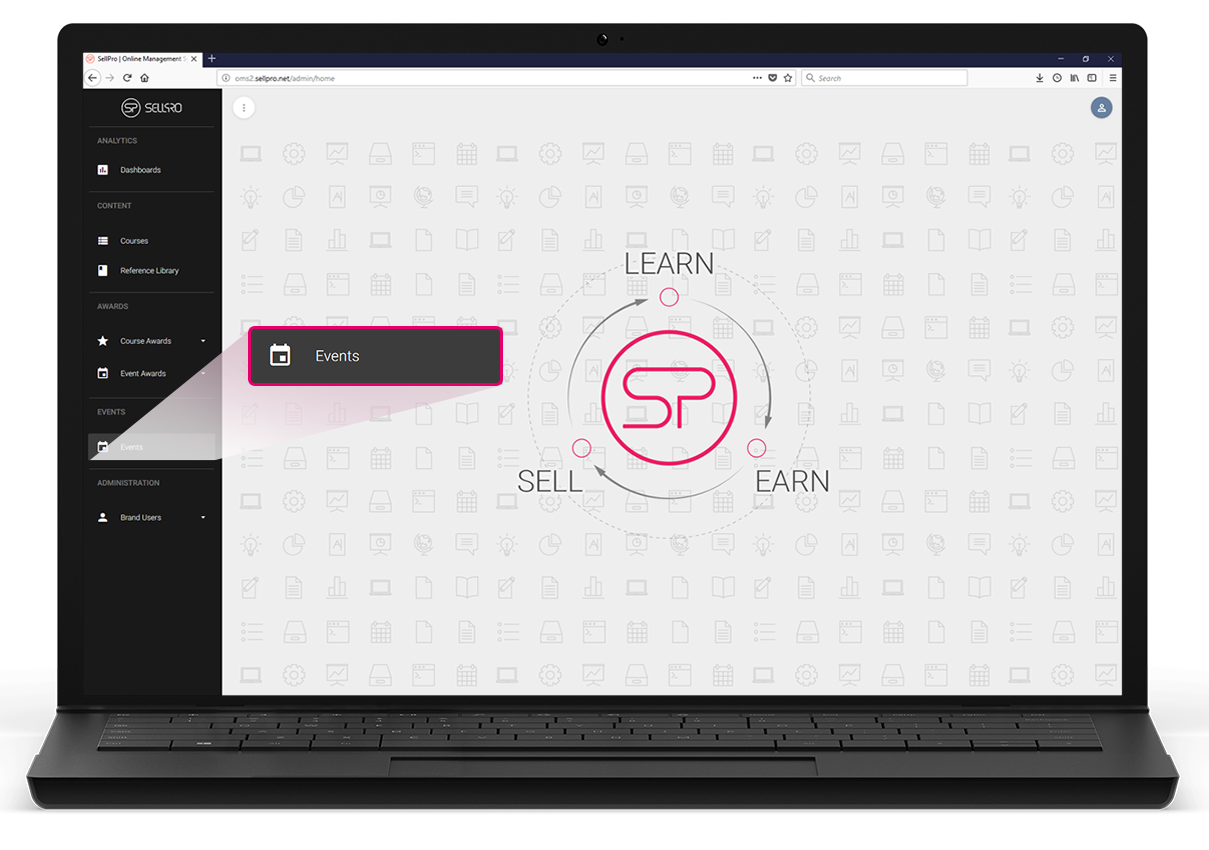
- Scroll to the Events section in the main menu and click on the Events menu item
- The events menu item will take you to a list of all the events you have created and the events you are a co-host of. Click on the + New Event button on the top right of the list
- This will reveal three different options, click on the desired event type:
a. Live (an event executed at a location, such as a movie theater, Dave & Buster's, etc)
b. Live-Single Store (an event executed at a specific retail store location, and is exposed to Sales Associates of that specific store, based on their profile info)
c. Virtual (an event executed over a video or phone conference)
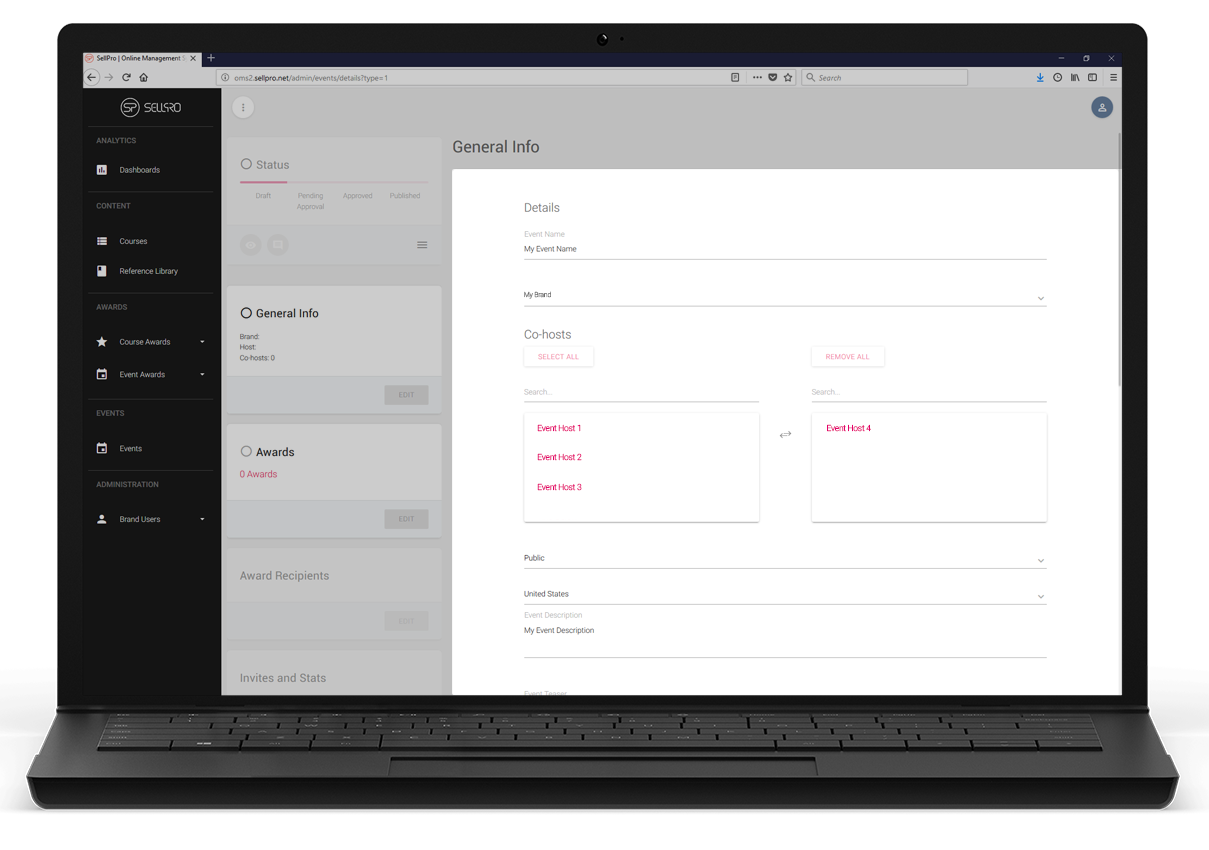
5. Once you have selected your desired event type this will take you to the General Info form where you can start creating your event:
a. Fill out all the requested fields
b. Here are explanations to some of the important fields:
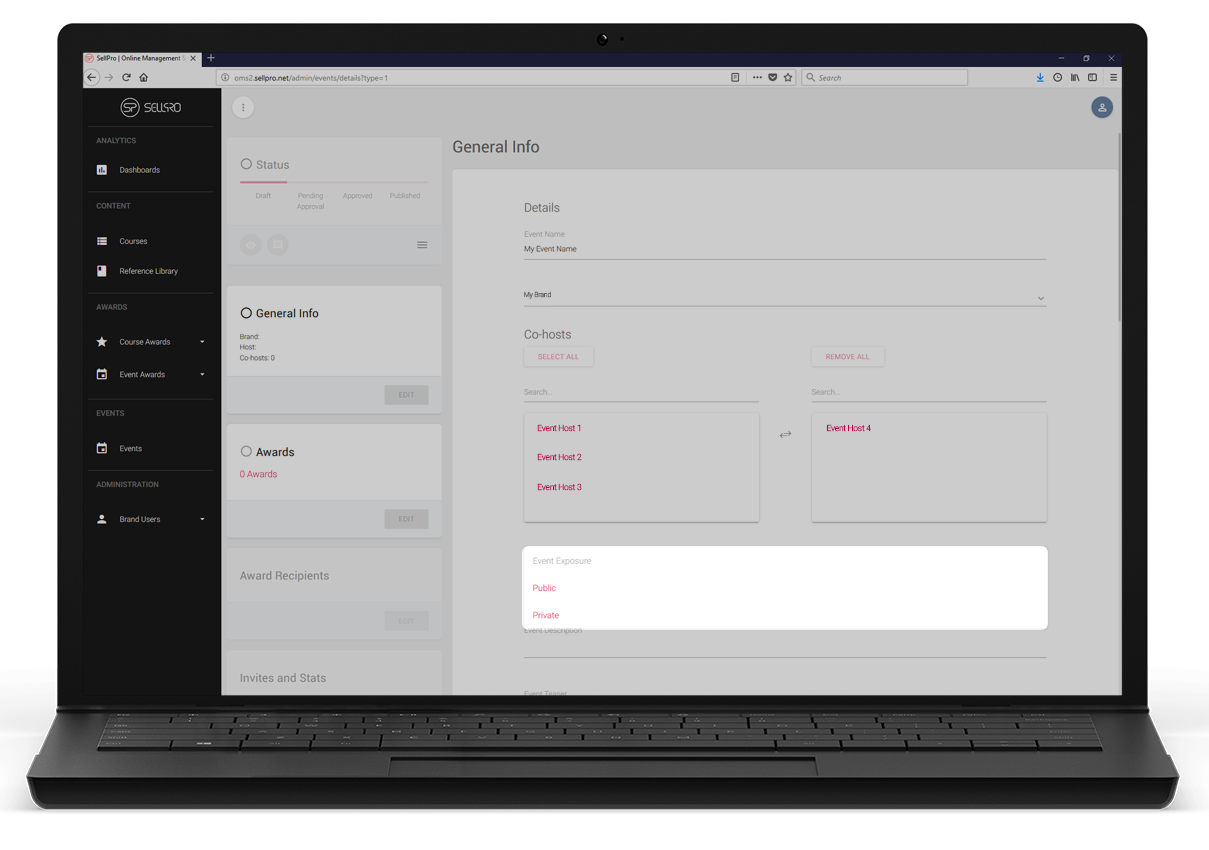
1. Public event.
a. Public events will be visible to all SellPro users who qualify for the event as soon as it is published
2. Private event (invite only).
a. General public will NOT see this event in the SellPro Events page.
b. Only invited users will be exposed to this event.
ii. Materials
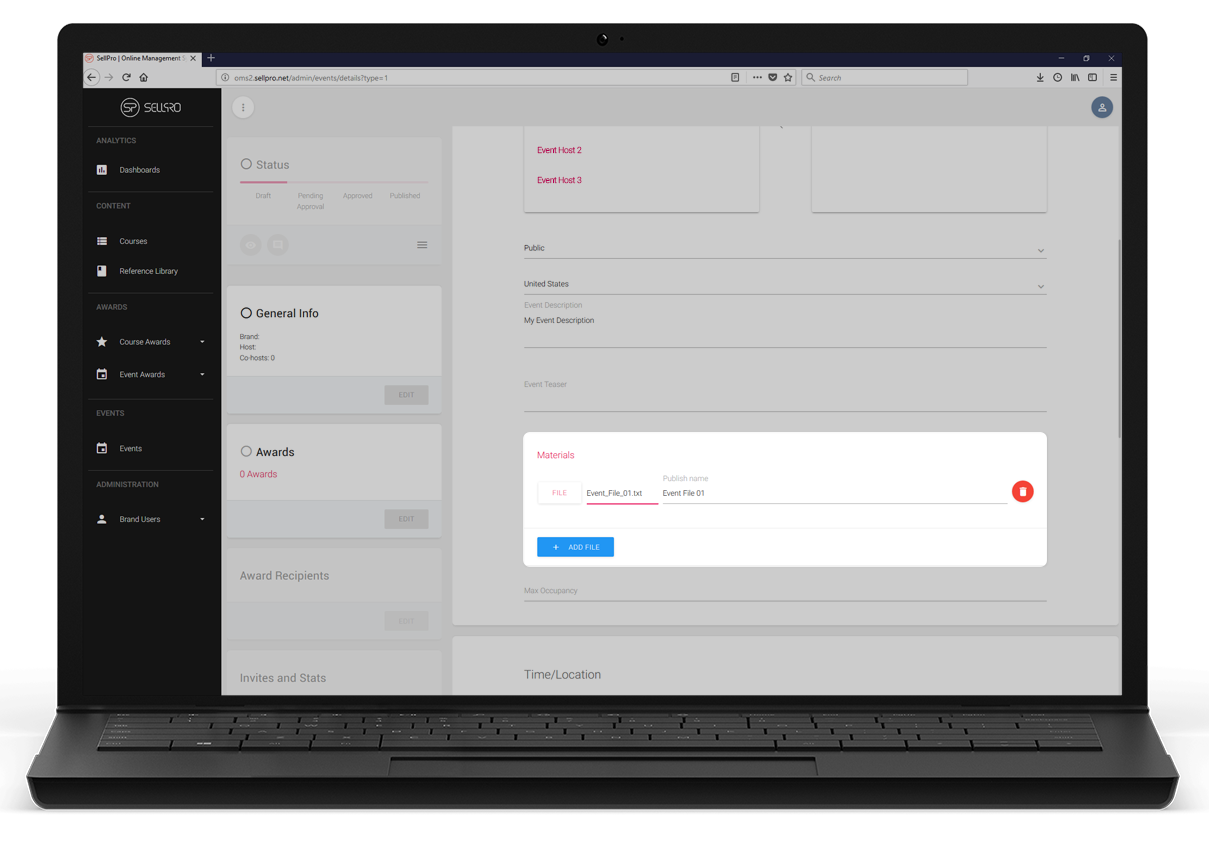
1. This option gives you the ability to attach supporting content for your event such as spec sheets.
iii. Retailers
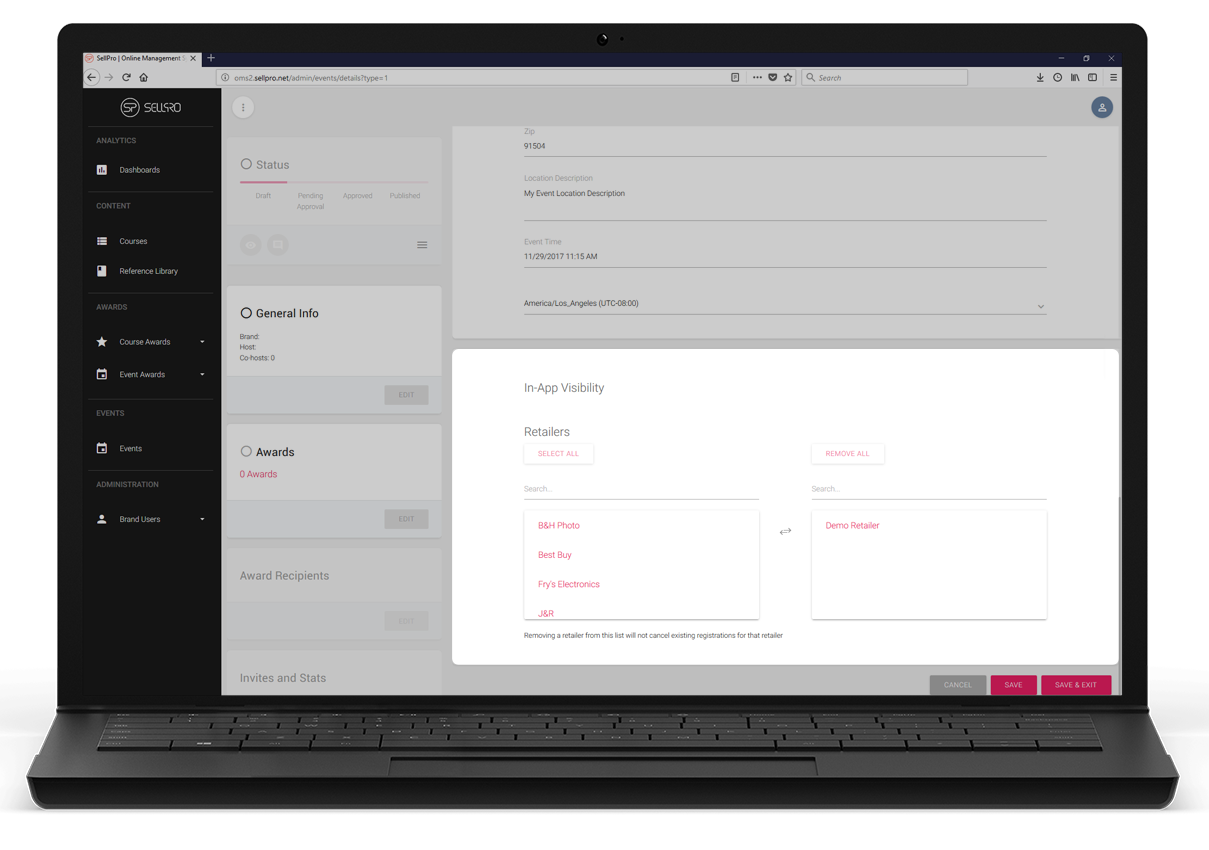
1. This is where you define which retailers you would like your event to be exposed (does not apply to Live-Single Store events as you will define this when you select your specific store)
c. Once you have completed the form, click Save & Exit at the bottom right of the form.
d. Once an event is saved, a new record is created for your event.
ADD AWARD TO EVENT (optional)
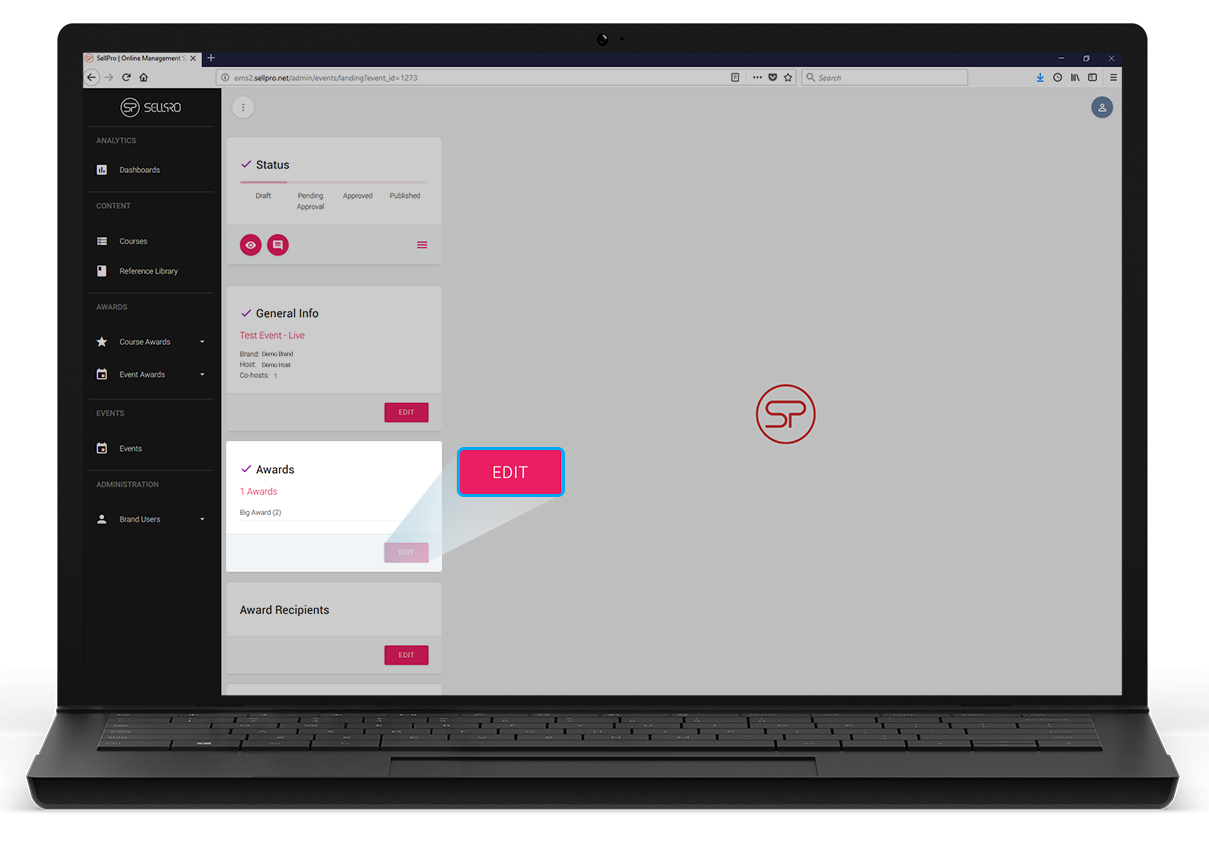
- If you are not already in the edit screen for your event, find your event on the events list and click the Edit button.
- Scroll down to the the Awards Tile and click the Edit button.
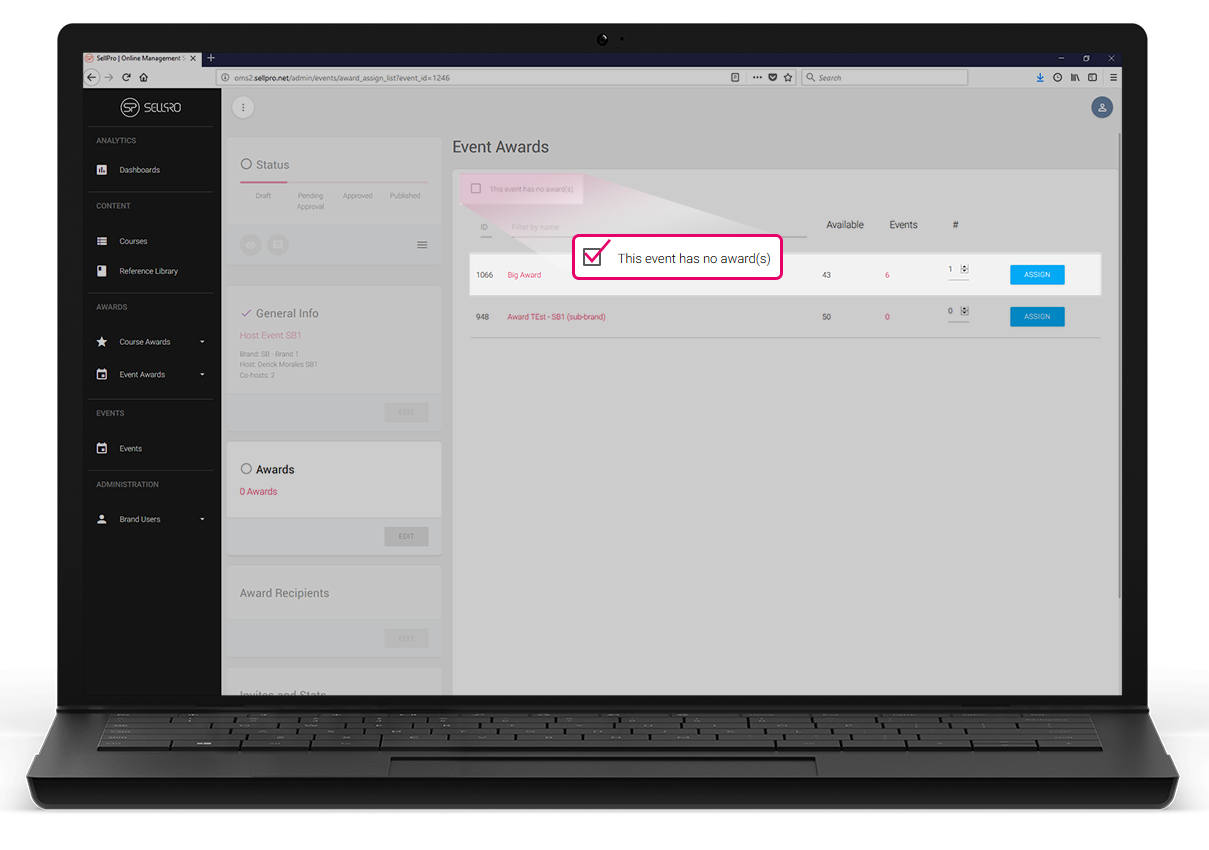
- This will reveal a list of available awards, find your desired award(s), enter the requested quantity and click on the Assign button.
- When you are done assigning your awards, scroll to the bottom of the form and click the Save & Exit button.
If your event will not have awards associated to it, go to the Awards Tile, click the Edit button and select the "This event has no award(s)" check box.
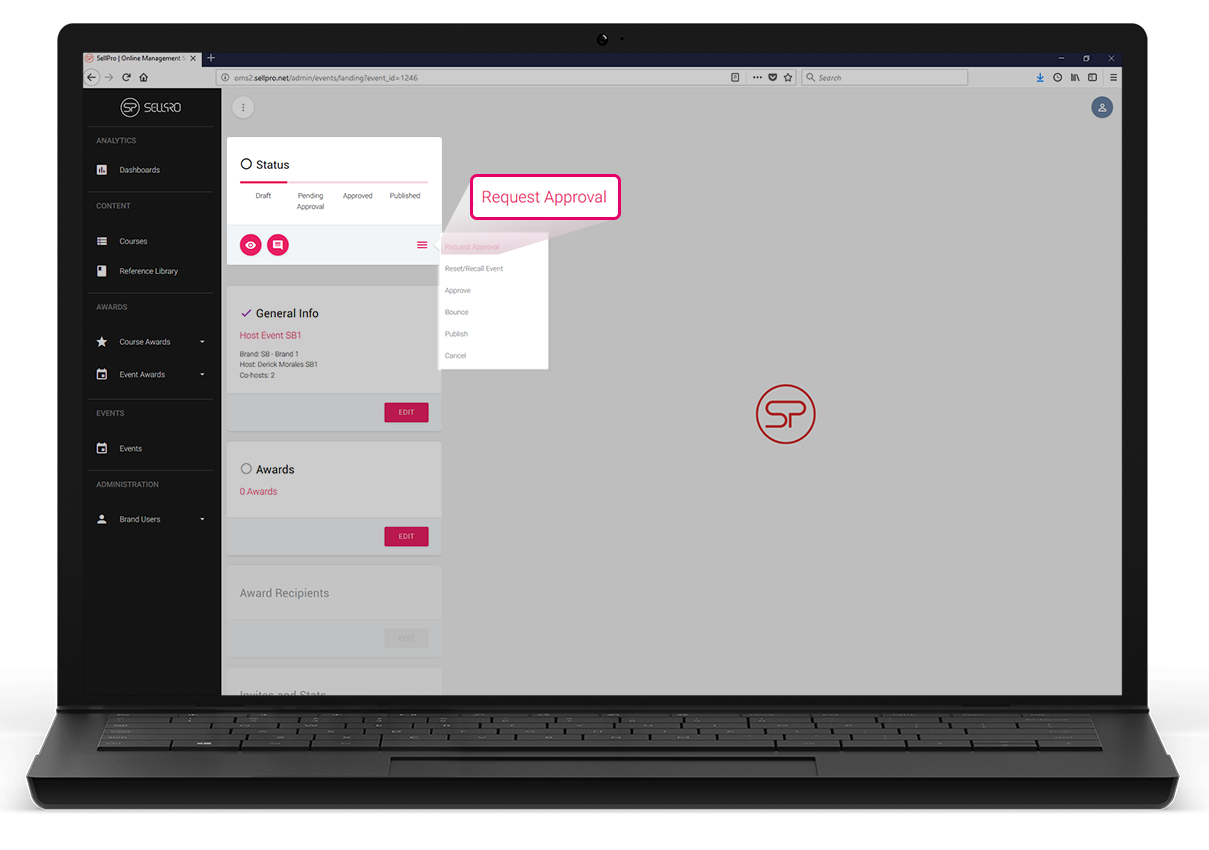
REQUEST APPROVAL
- If you are not already in the edit screen for your event, find your event on the events list and click the Edit icon.
- Go to Status Tile (located on the top left) and click on the hamburger button, this will reveal a status options menu.
- Click on the Request Approval option to submit your event for approval.
-
If Approver bounces event, he or she will provide you with comments regarding changes that must be made before approval can be granted. Once appropriate changes are made, submit your event for approval again.
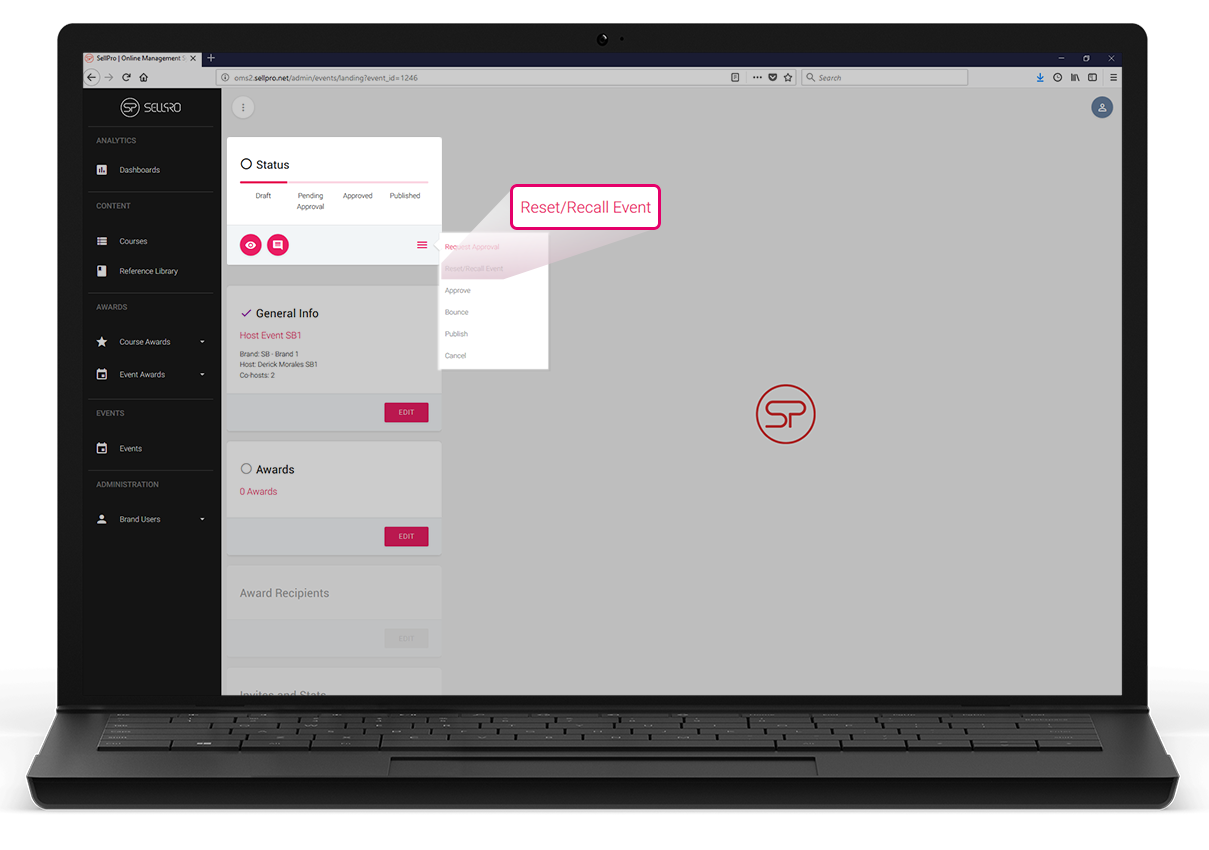
Once an event is approved, specific fields cannot be edited or modified in any way (e.g., event location, time, etc. cannot be adjusted).
If changes to those fields must be made, this event must be recalled through the Status tile by clicking on the Reset/Recall Event option. Once all the desired changes are made, the event must be re-submitted for approval.
Published events cannot be recalled.
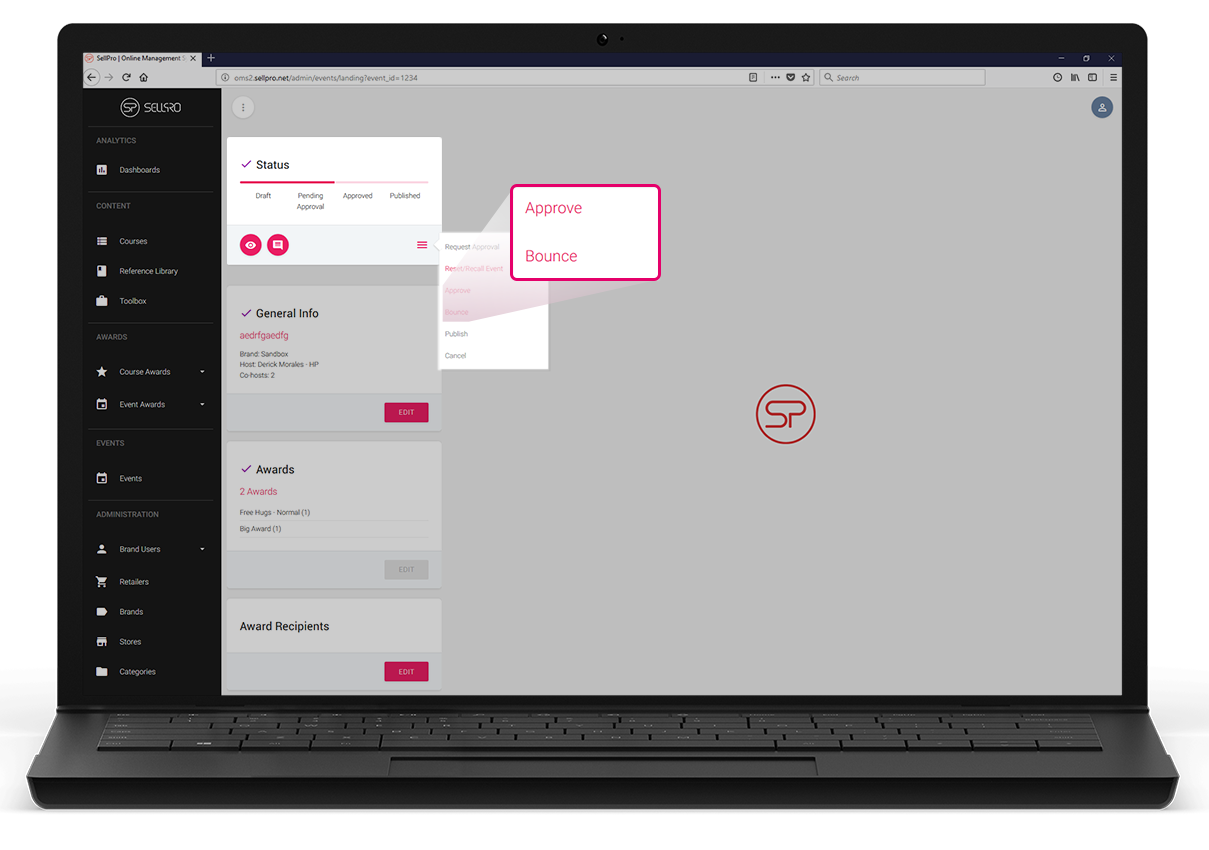
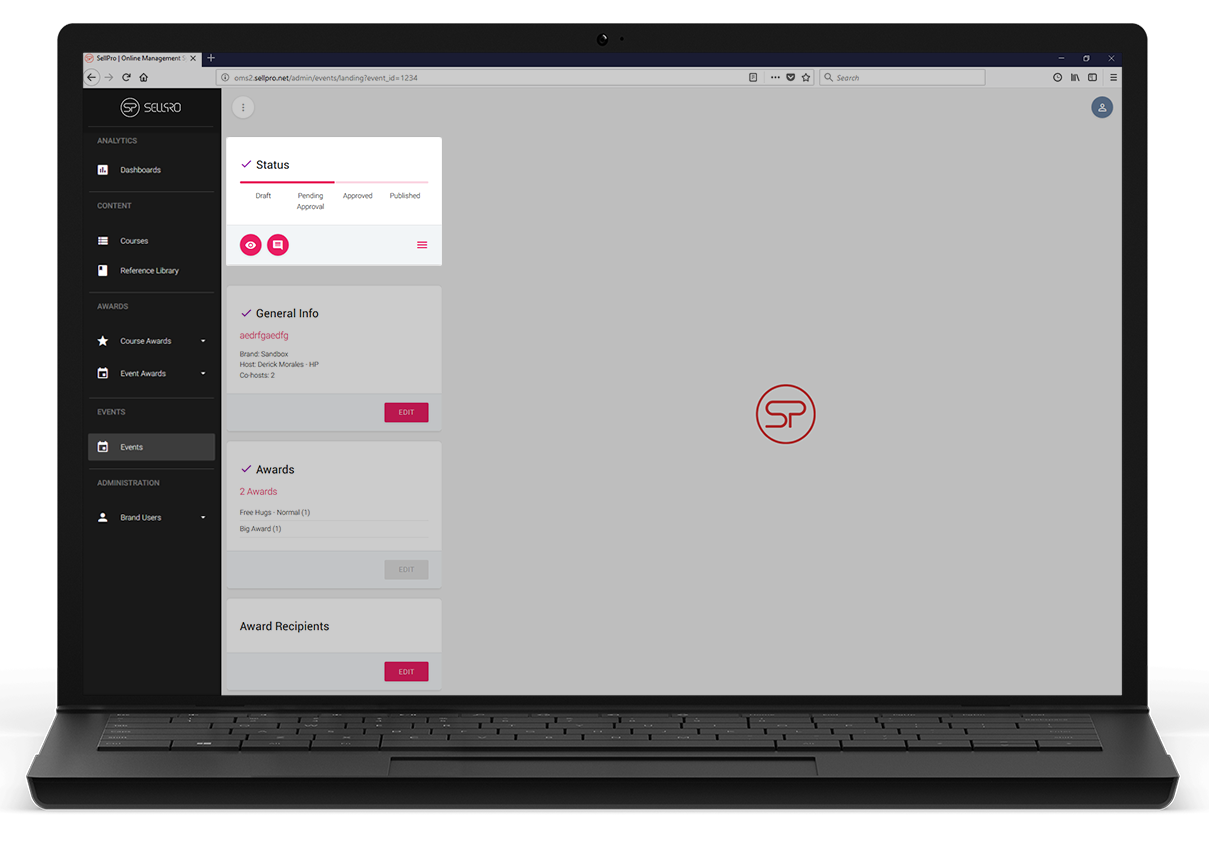
APPROVE/BOUNCE EVENT
- Once host submits event for approval, you will receive a notification e-mail.
- Click on the link in the e-mail and log in.
- Find the Status tile, located on the top left and click on the hamburger button to reveal your options.
- Choose to Approve or Bounce the event [1].
- If bouncing the event is needed, you will see a popup, into which you may enter notes for host.
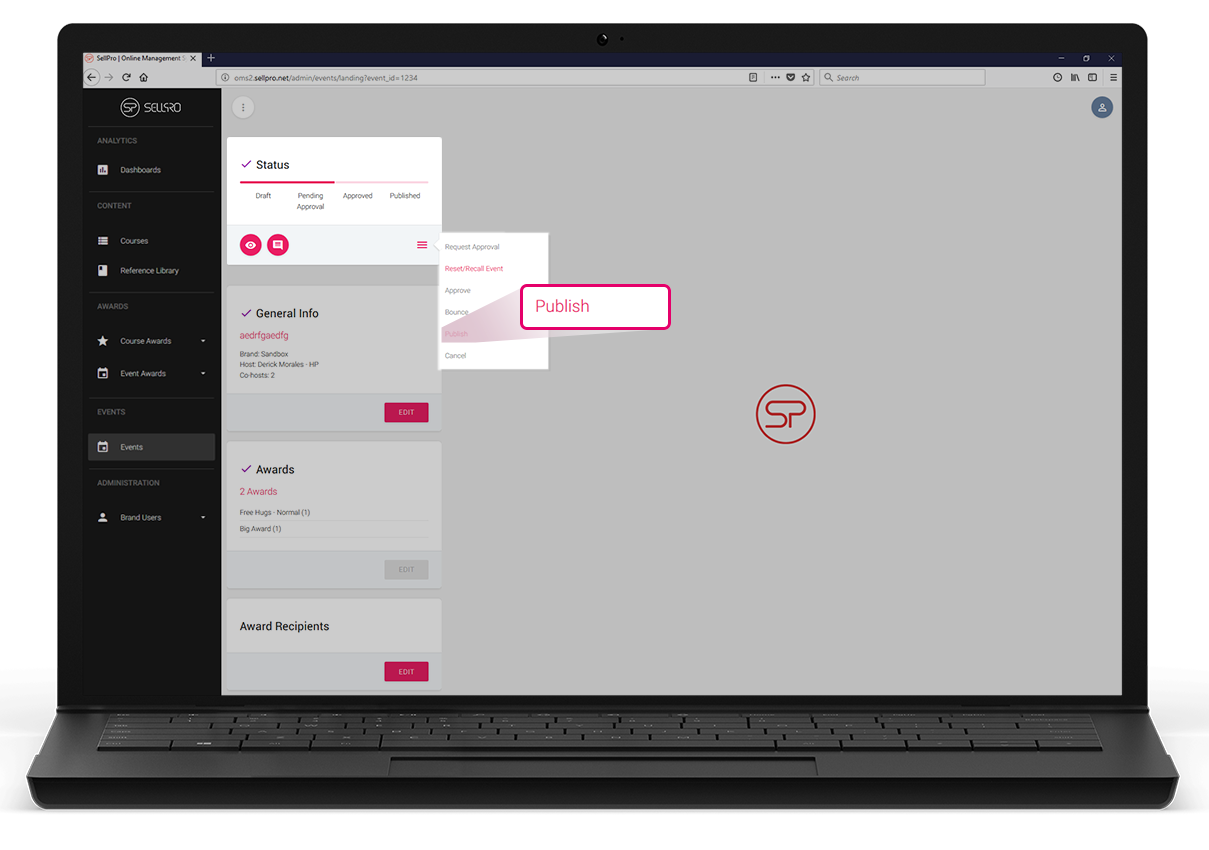
PUBLISH EVENT
- Once approval is received, your event is ready to be published.
- Find the Status tile, located on the top left and click on the hamburger button to reveal your options.
- Selecting Publish will expose event in-app to users who meet host’s event participant criteria (if your event is Public).
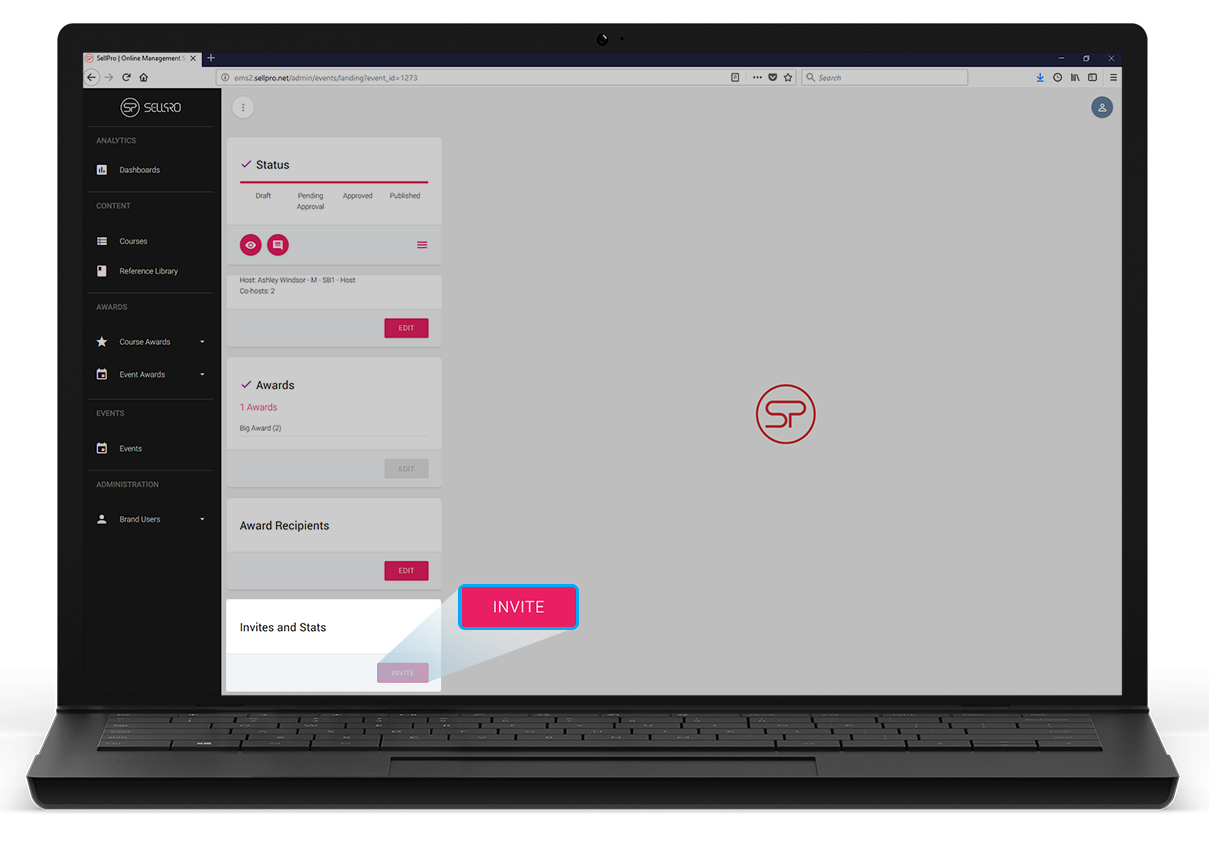
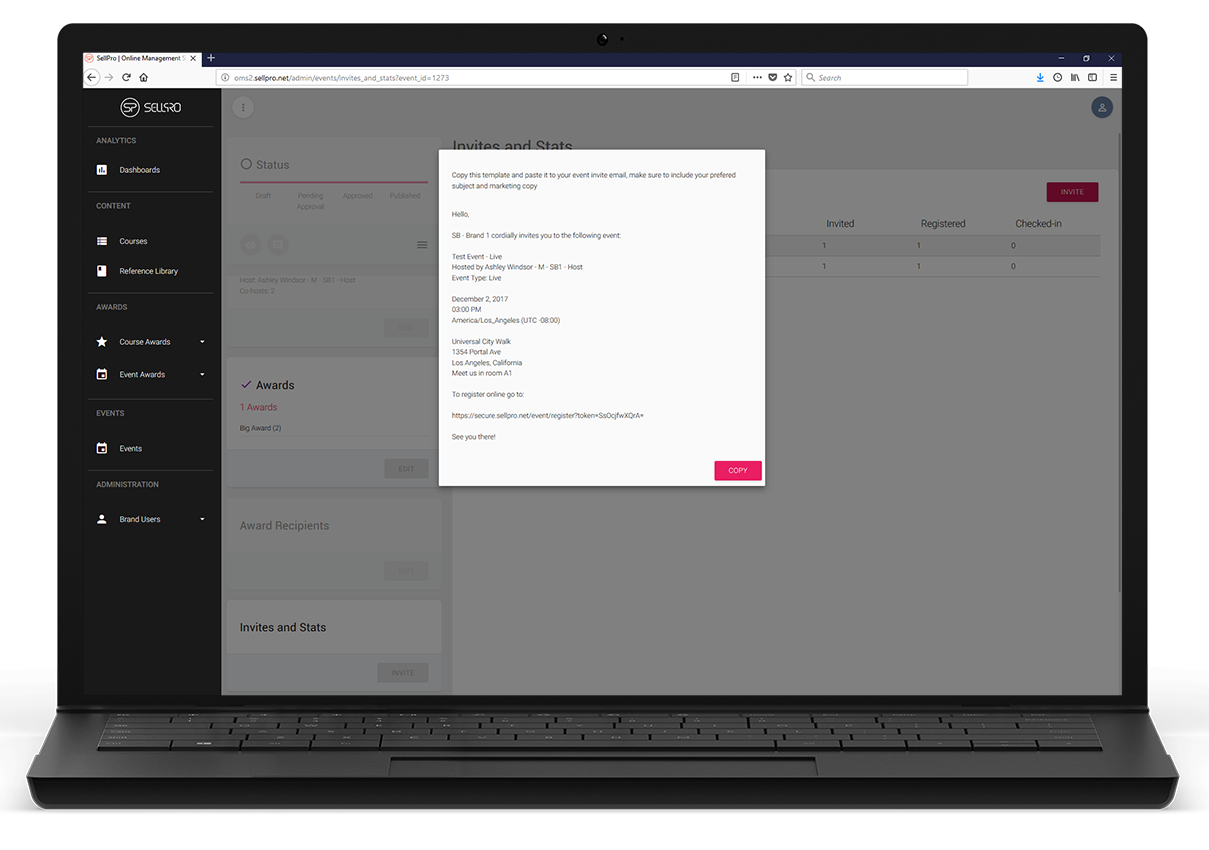
INVITE
- If you are not already in the edit screen for your event, find your event on the events list and click the Edit icon.
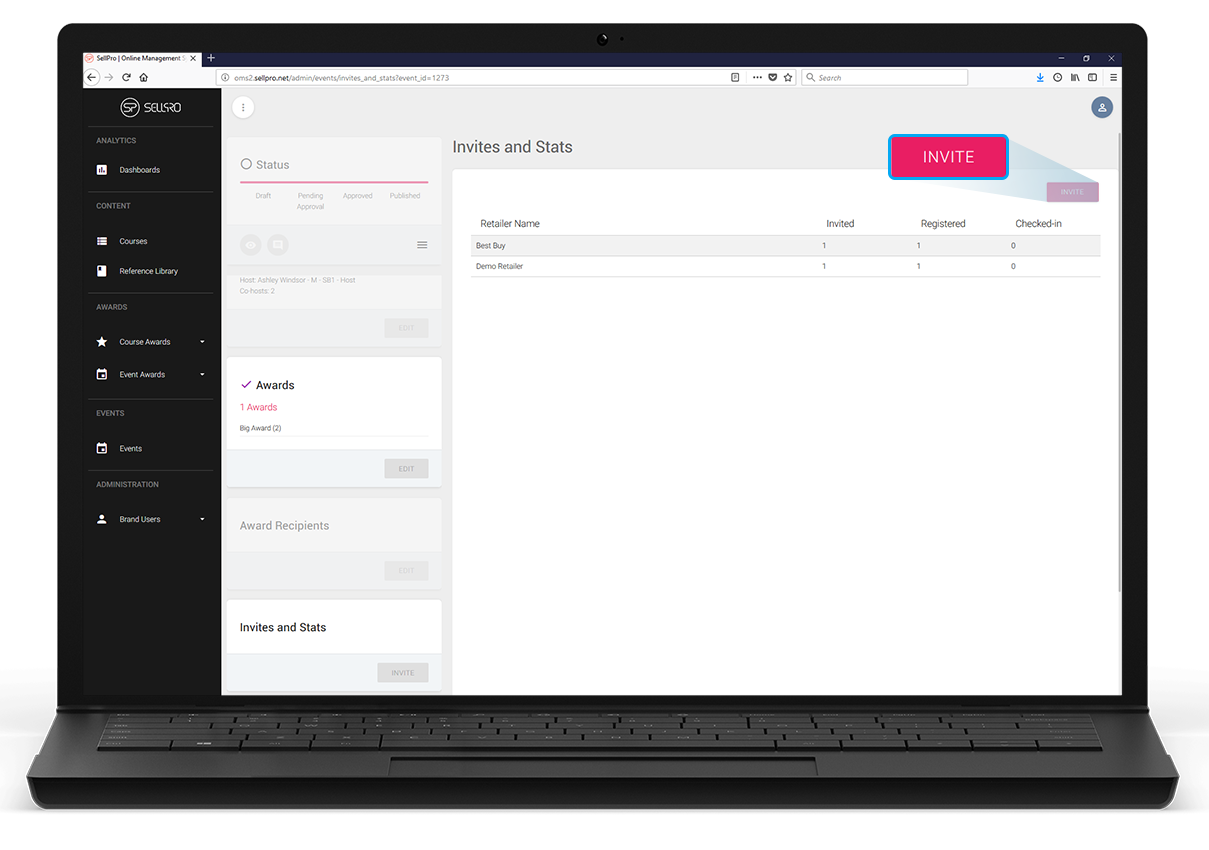
- Scroll down on the tiles section and find the Invites and Stats Tile and click the Invite button.
- Find and click the Invite button located on the top right of the Invites and Stats screen.
- This will reveal a template you can copy and paste on to your preferred email client, to invite Sales Reps to your event.
This invite template contains a personalized URL for your event. This URL will take users to an event registration page where they can register by using their SellPro account or register as guests.
EVENT PREPARATION (Physical Event)
-
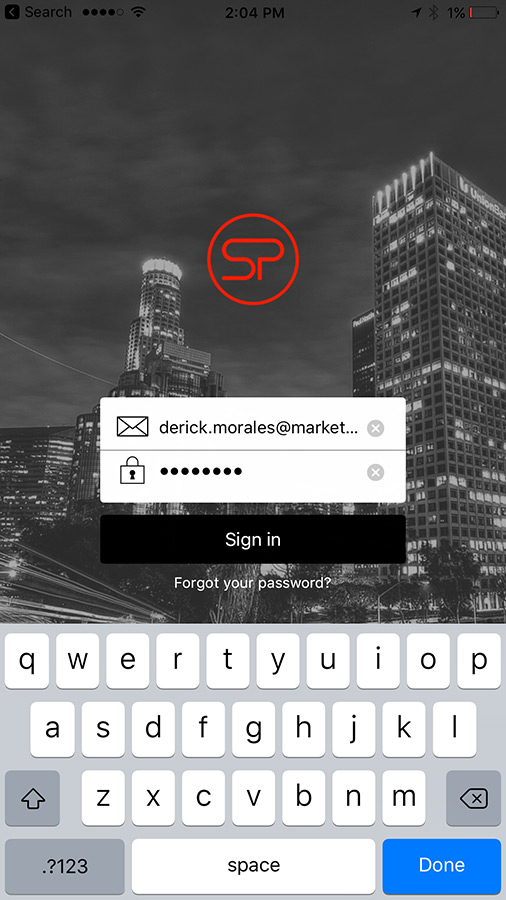
Log in to SellPro with your regular Brand Rep user account credentials.
-
Tap on master Sync from the Home Screen, make sure all content is up to date on your device (this ensures no disruption will occur when you're syncing event data like check-ins).
-
There may not be Wi-Fi at event location, so sync SellPro as close to event start time as possible while within reliable Wi-Fi network. This will ensure you, as host, capture information for all registered users.
ATTENDEE CHECK-IN (Physical Event)
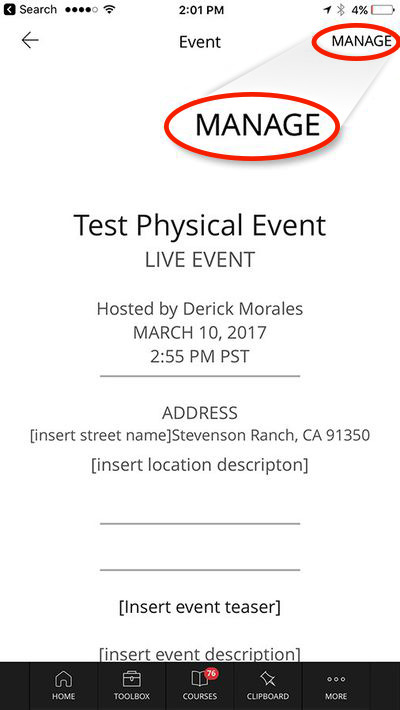
- Log in to SellPro.
- Find your event in the Events screen.
- Tap Manage at the top right of your event screen.
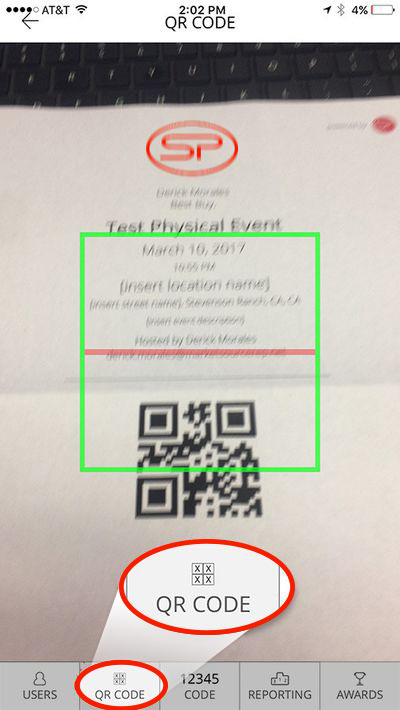
- Check in attendees:
-
- QR Code: use to check in people who have QR code.
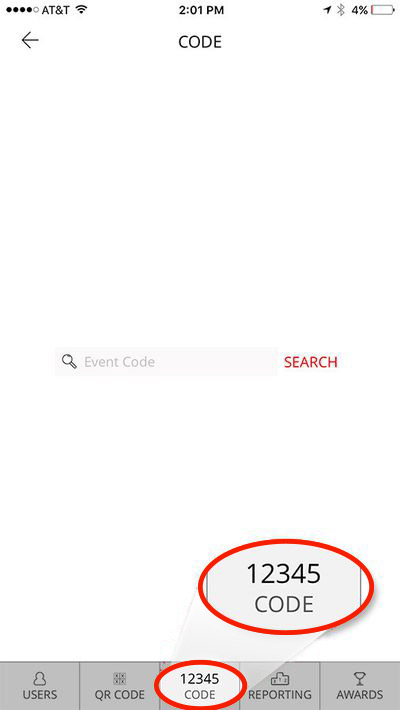
- If you receive the following message: “Code not recognized,” tap Back button. Select Code from event page and check user in by entering numeric code mentioned on their event pass.
- Alphanumeric: use to check in people if QR code does not register. Alphanumeric code can be found under QR code on event passes.
- QR Code: use to check in people who have QR code.
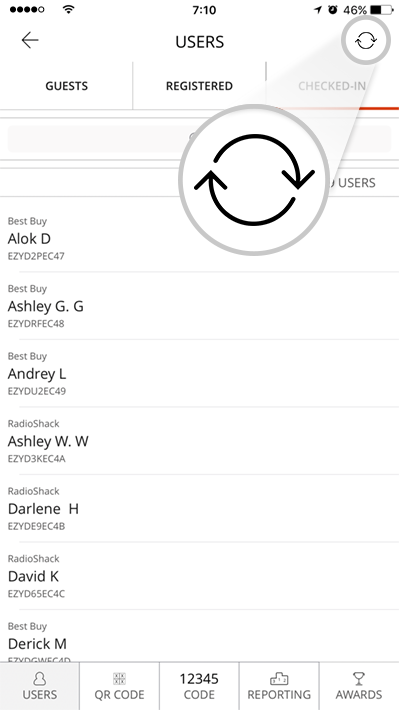
- To ensure check-ins are registered to the servers; make sure to regularly sync your events. To do this, tap the sync icon on the top right corner of the 'Users' screen (as displayed on the image below).
- Physical events update to "Closed" status three hours after the event start time. Once events are "closed", Hosts/Co-Hosts will no longer be able to check-in users.
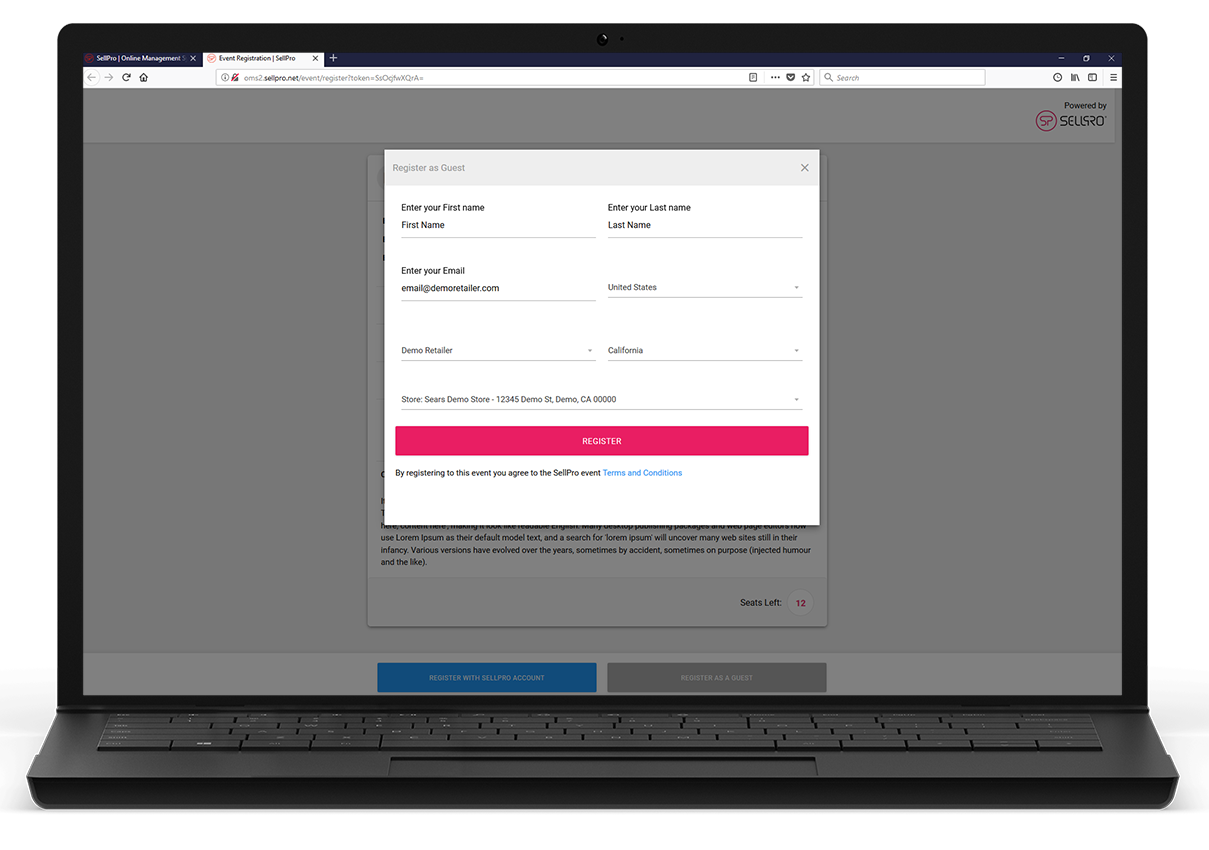
WALK-IN REGISTRATION AND CHECK-IN (Physical Event)
- Log in to SellPro OMS with your Host access credentials.
- Scroll to the Events section in the main menu and click on the Events menu item.
- Find your event and click on the Edit icon.
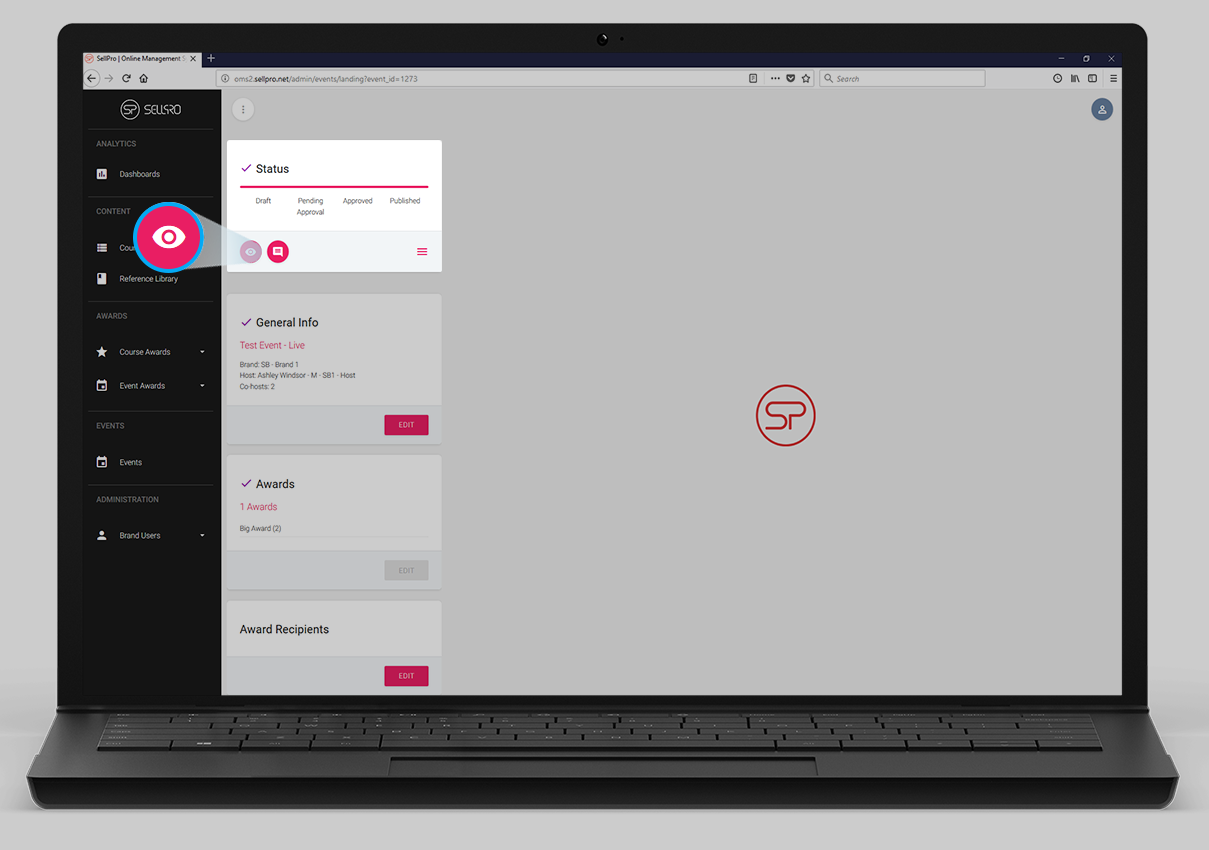
- Find the event micro site button located in the Status tile (this button looks like an eye).
- On the rendered event micro site, find and click on the REGISTER AS A GUEST button.
- Fill out the required fields on the event registration form by entering the information for the walked-in attendee. Click on the REGISTER button at the bottom of the form when complete.
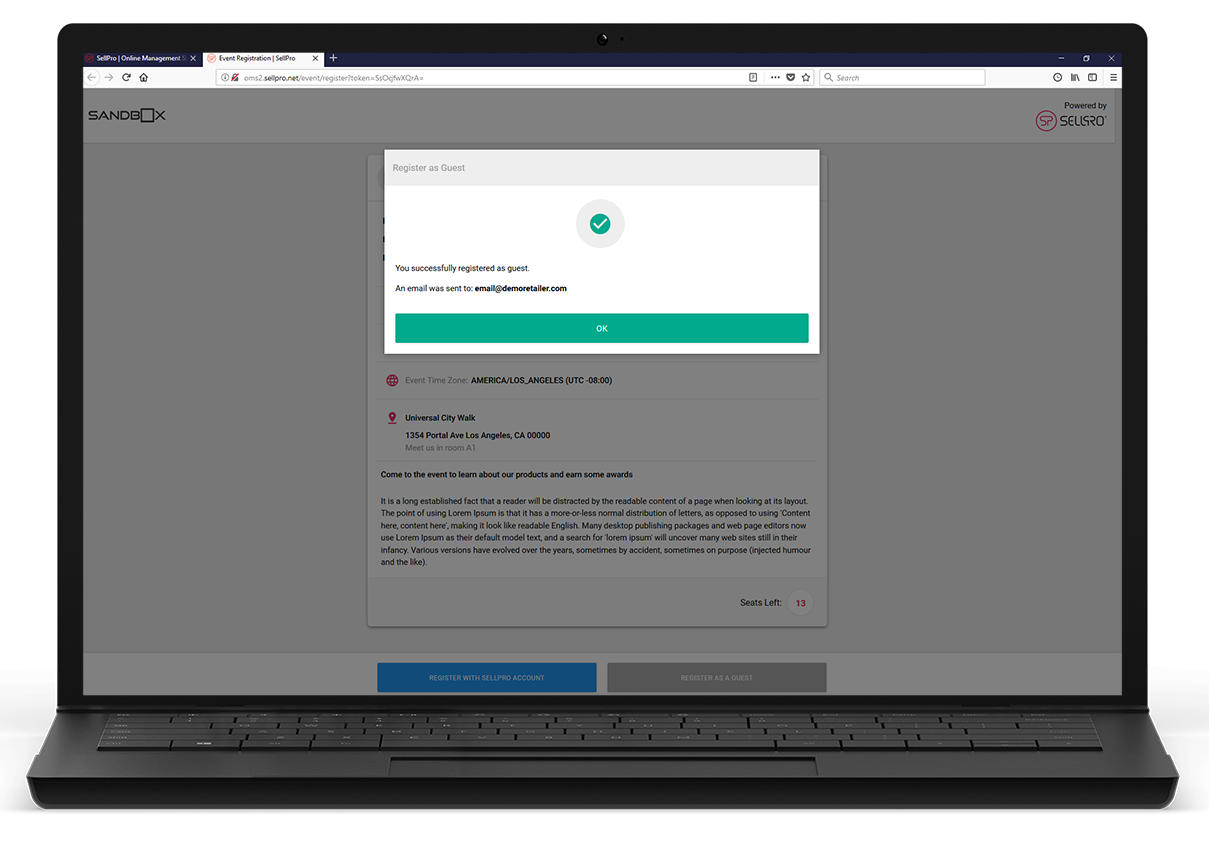
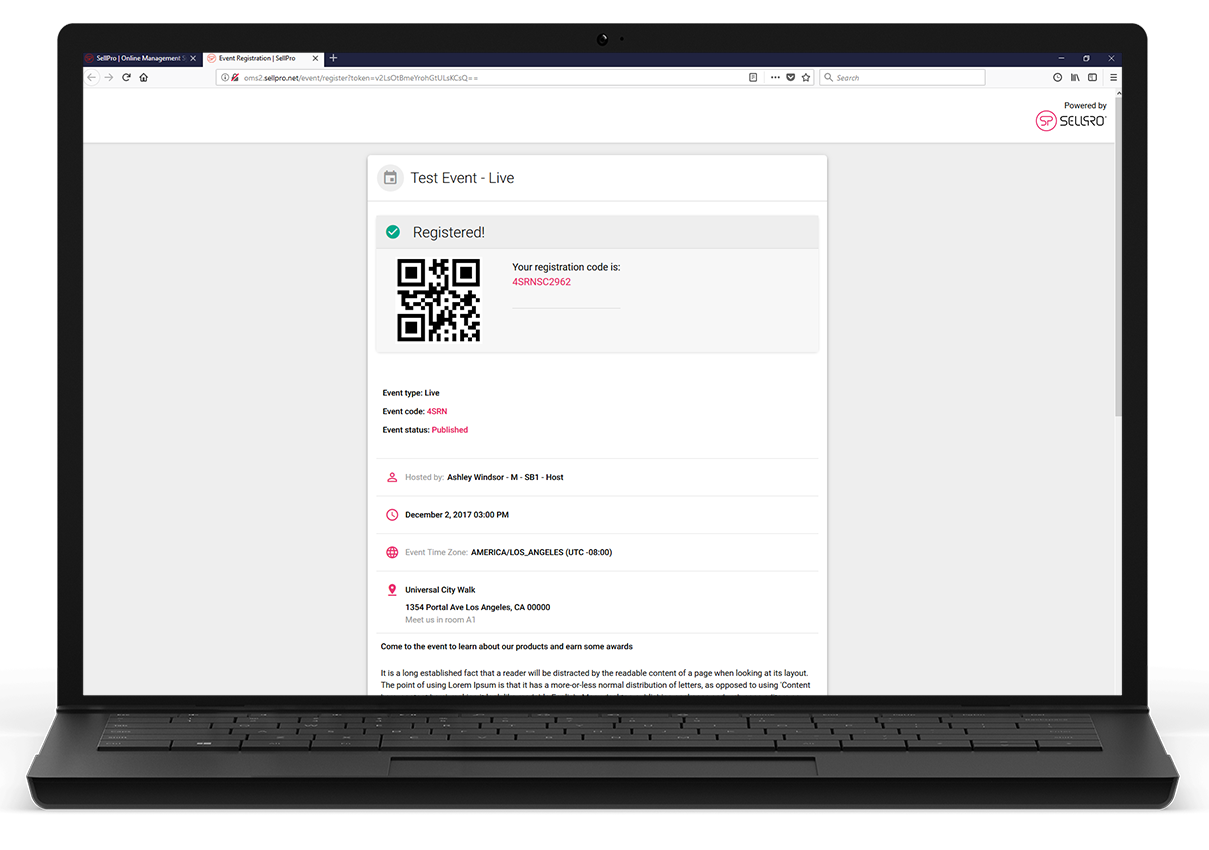
- This will reveal a confirmation page, click on the OK button and this will take you to a page with a QR code.
- Scan the newly registered user's QR code.
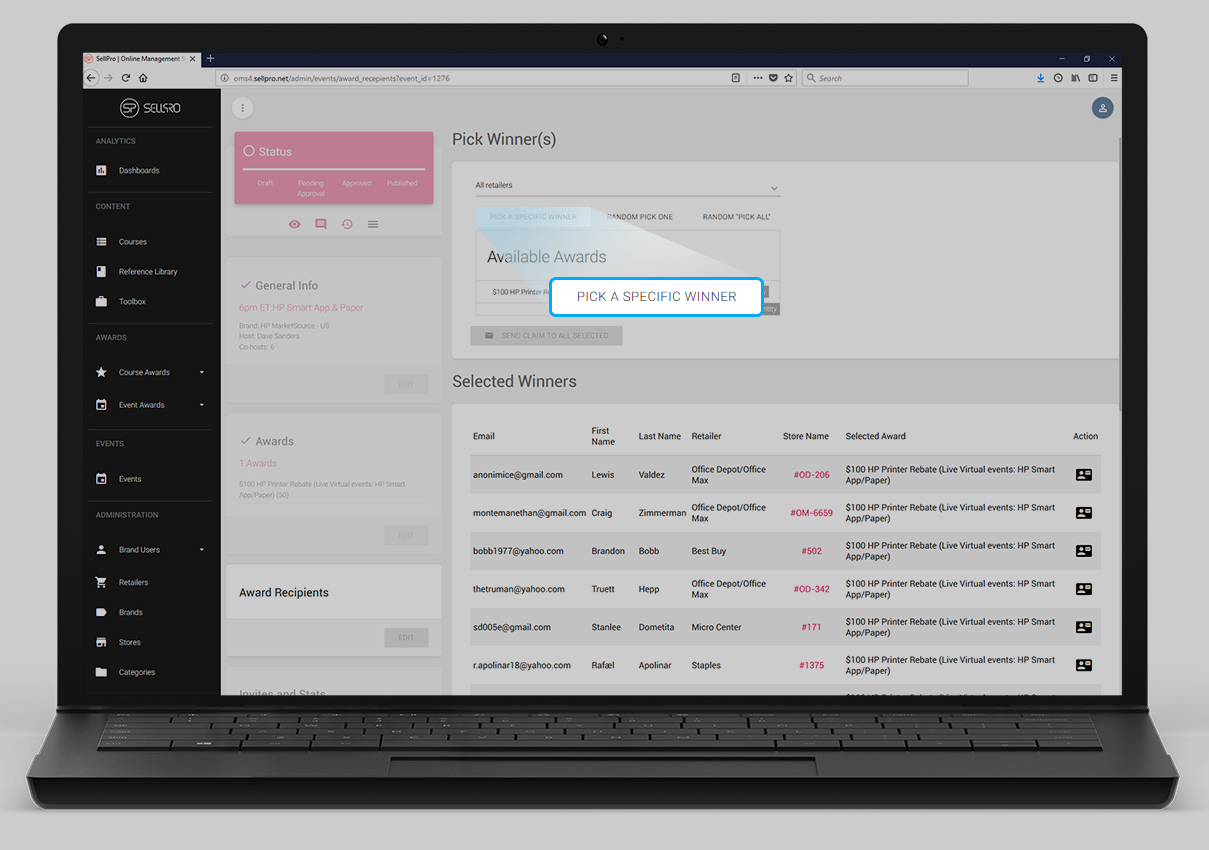
SELECTING AWARD RECIPIENTS
This only applies if an award(s) were assigned to the event.
In preparation for your physical event, it is recommended that you print out the unique award certificate(s) so you have them on hand at the event. To do this:
- Log in to SellPro OMS with your Host access credentials.
- Scroll to the Events section in the main menu and click on the Events menu item.
- Find your event and click on the Edit icon.
- Scroll down to the Award Recipients tile and click the Edit button.
- This will take you to a page where you can pick your award winners.
- First select your desired retailer or select "All retailers" (this is selected by default).
- You have three options on how you would like to select your award winner(s).
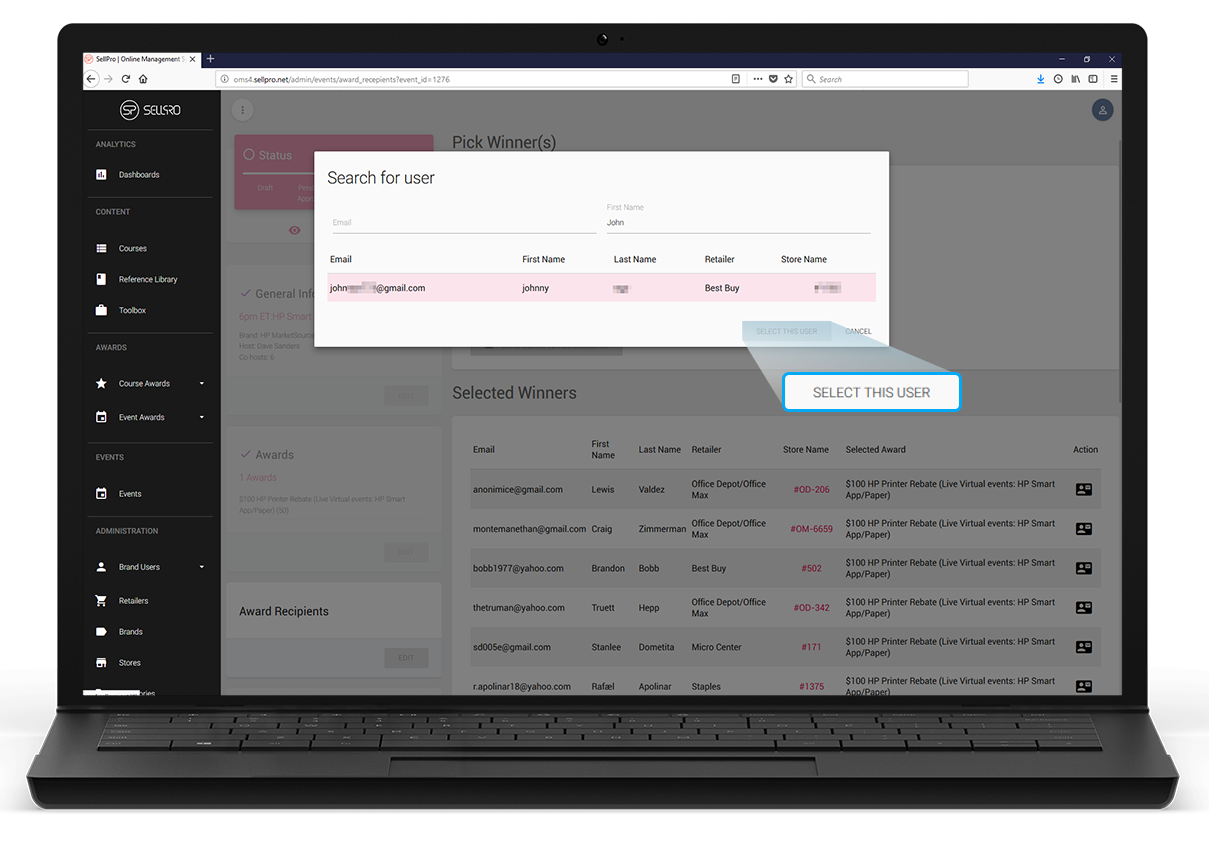
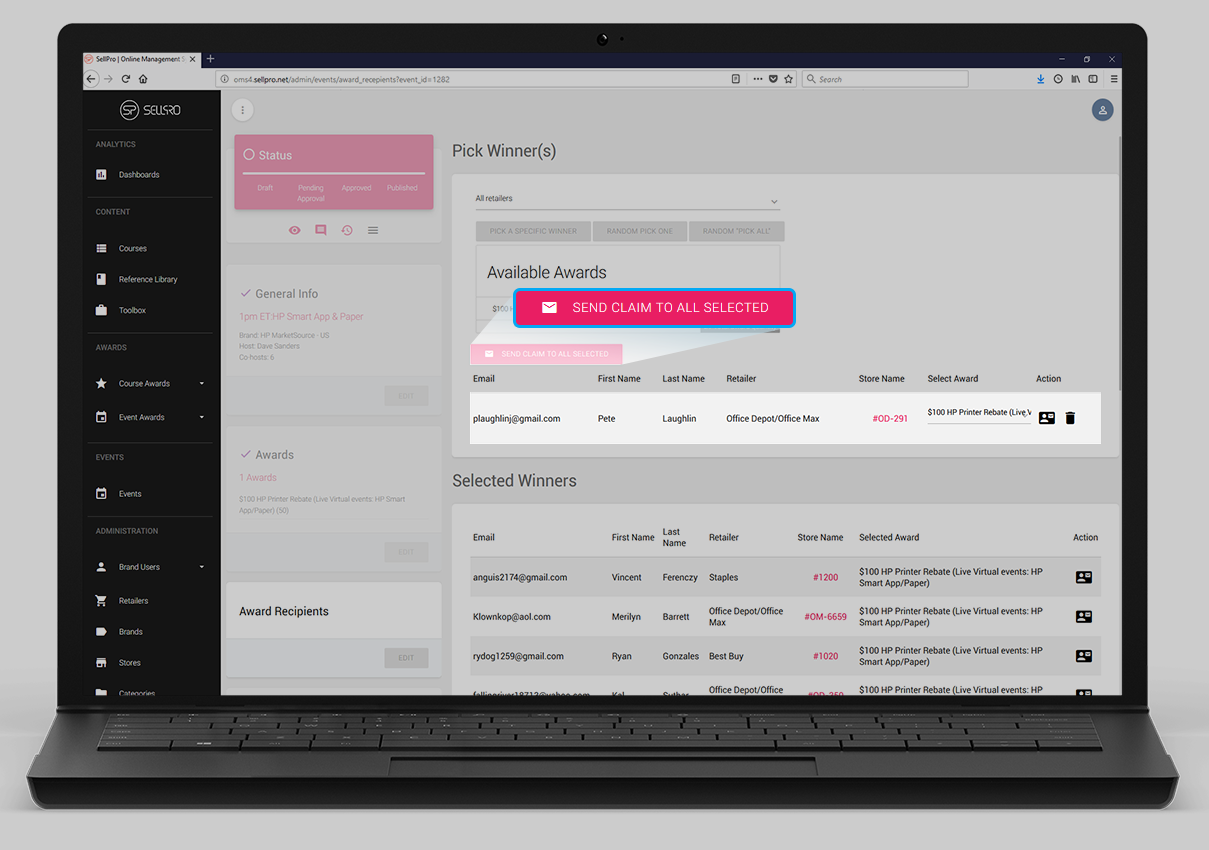
- PICK A SPECIFIC WINNER
- Clicking this will reveal a pop-up where you can search a specific user by email or name.
- Once you find the user you were looking for, click on the line item and click the SELECT THIS USER button.
- This will add the user to your list, simply select the award you would like to assign to him/her and click on the SEND CLAIM TO ALL SELECTED to send the user a claim email.
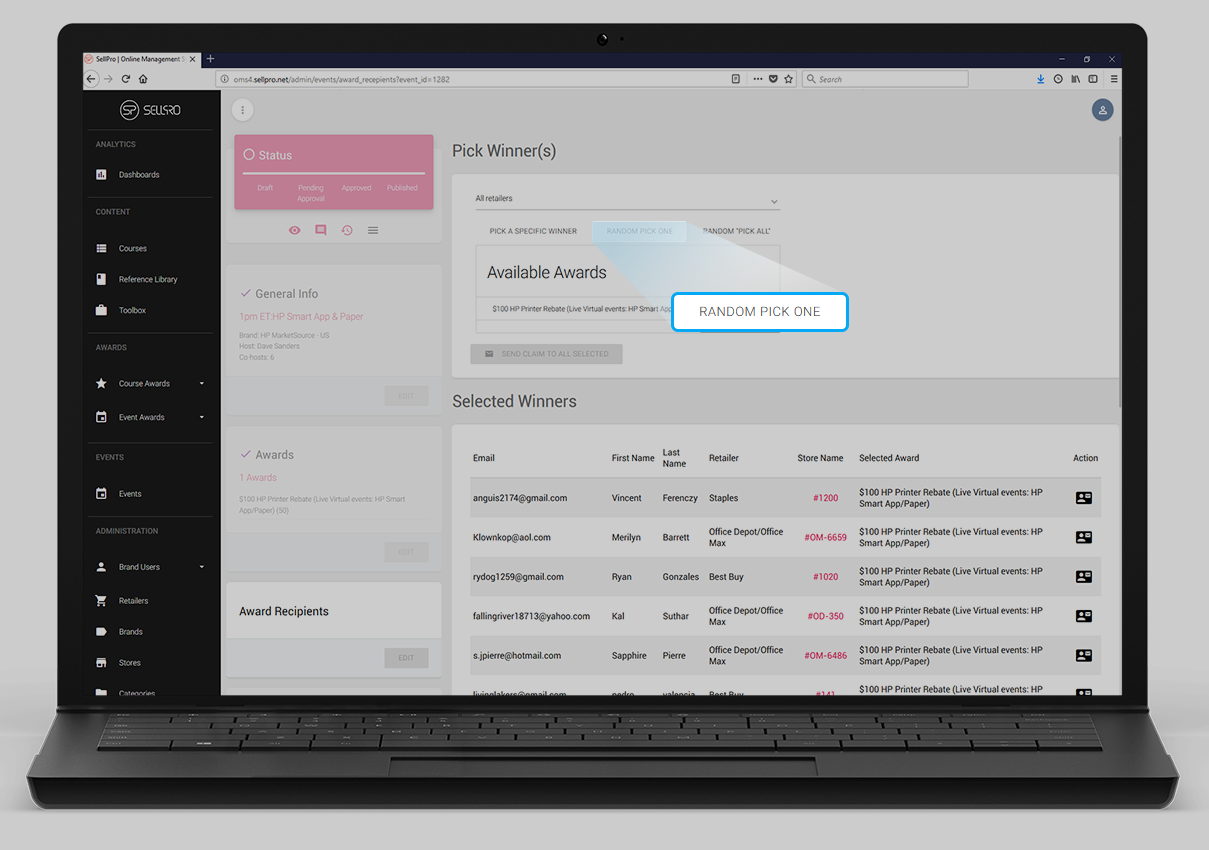
- RANDOM PICK ONE
- Clicking this will randomly select a user and add him/her to the list.
- Simply select the award you would like to assign to him/her and click on the SEND CLAIM TO ALL SELECTED to send the user a claim email.
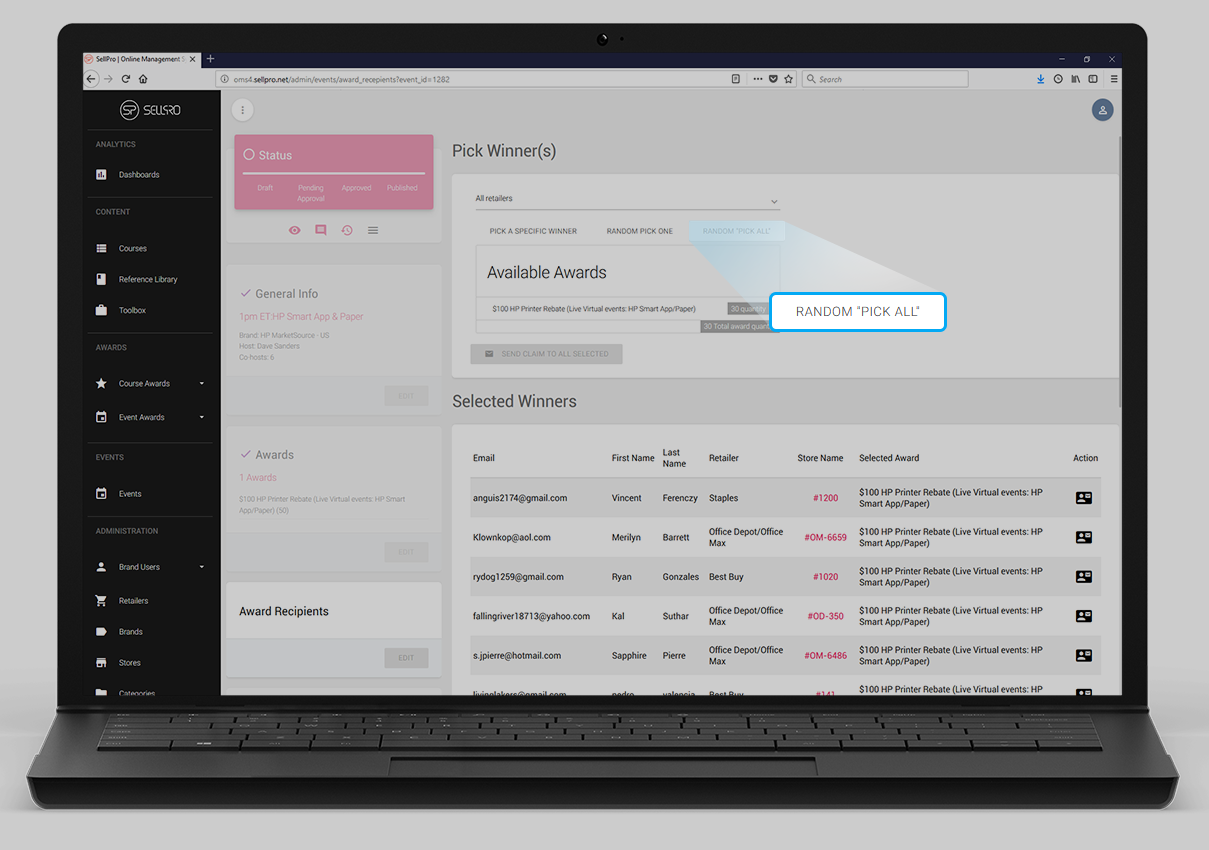
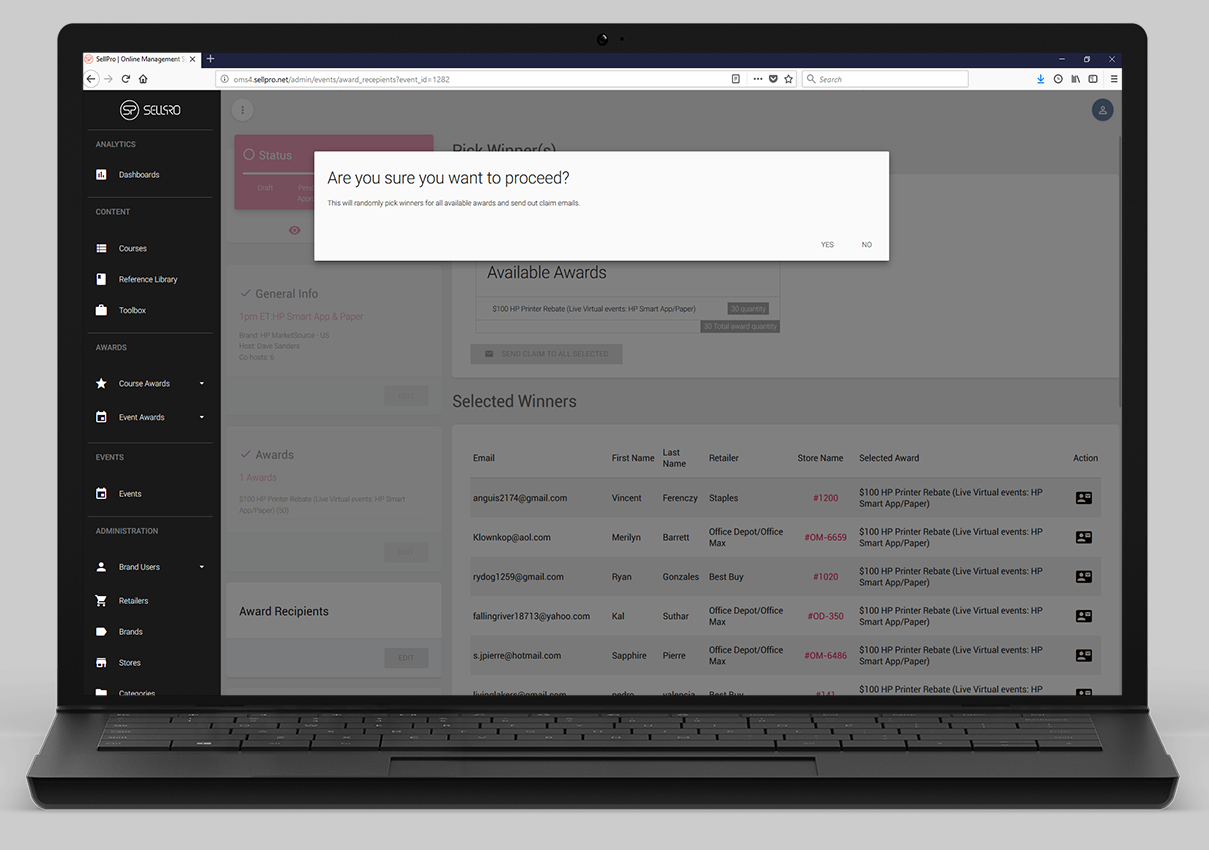
- RANDOM PICK ALL
- Clicking this will reveal a confirmation pop-up, click YES or NO as desired.
- Clicking YES will randomly pick winners for all available awards and send out claim emails automatically.
- PICK A SPECIFIC WINNER
- Only SellPro users who successfully checked in to your event are eligible for awards.
- You must select your the award winners and send out award claims for your event within 7 days of your event date or your awards will be removed from your event and added back into the event award inventory.
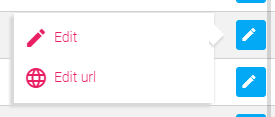
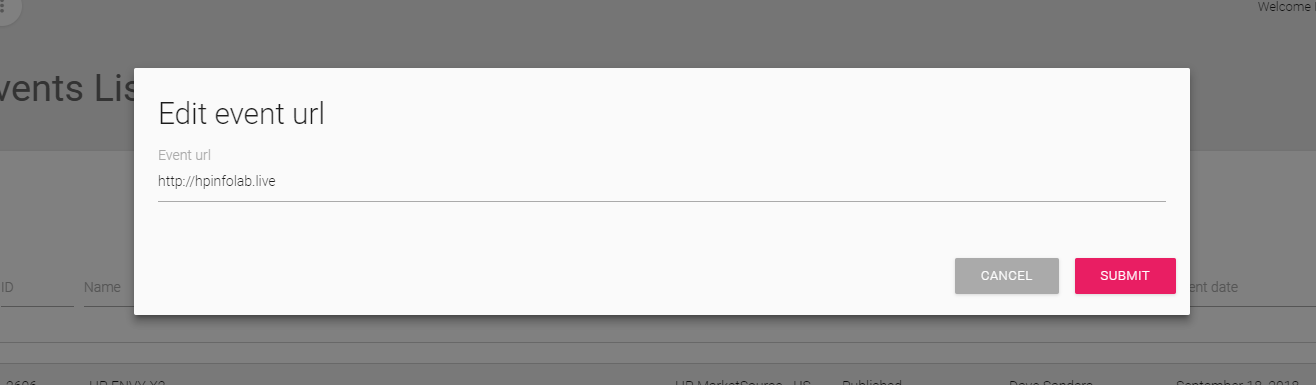
EDITING THE EVENT URL
You can edit the event URL at any time after the event is created and before the event date/time.
To do this:
- Click on the "Events" button on the OMS main menu
- Find the desired event in the event list
- Click the Edit button to the right of the event, this will reveal a sub-menu
- Click the "Edit Url" option, this will reveal a pop-up that allows you to edit the existing URL
- Update the URL and click on the "Submit" button
Was this article helpful?