How do I create a Course in SellPro's OMS?
We'll show you how to quickly assemble micro-learning content using SellPro's 5-step guided course creation process, along with some tips to help make the most of your content.
Click/tap the thumbnail above to watch the video of this tutorial.
1. Interface / Getting Started
Log into the SellPro Online Management System (OMS), and look for COURSES in the sidebar.
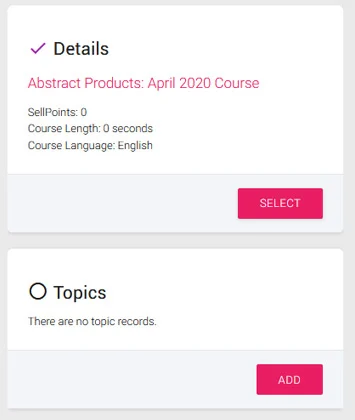
The Course list shows all the Courses that have been previously created. If you wish to edit an existing Course, select the EDIT![]() icon next to that Course. Courses can be edited as long as they have not been activated.
icon next to that Course. Courses can be edited as long as they have not been activated.
To start building a new Course, select NEW COURSE ![]() .
.
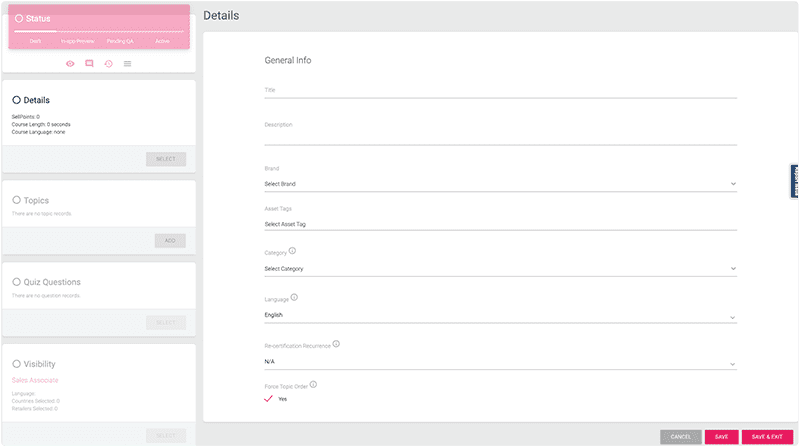
The Course creation screen (above). The Status Bar (below) and Content Steps are along the left side of the screen.
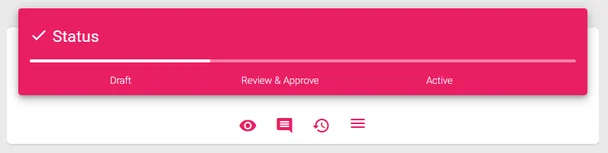
The status bar shows the current status of the Course.
-
Draft. All content assembly and editing is performed while the Course is in this mode.
-
Review & Approve. This is a special preview of the Course that is used in OMS to test and approve the Course before launching. In this mode, Course is not visible to real SellPro users, so appearance and behavior can be tested within the OMS as well as within the app without anyone other than the designated Content Approver seeing it. If changes need to be made, the Course can be reverted back to Draft to make those changes and then resubmitted until it is approved for launch.
-
Active. Once the Course has been approved, it can be Activated. Once activated, the Course will immediately go live to SellPro users, and they will receive a notification in the SellPro Feed that the Course is available.
The icons under the status bar:
![]() — Browser preview. Quickly check Course content using an in-browser preview before submitting it for Approval.
— Browser preview. Quickly check Course content using an in-browser preview before submitting it for Approval.
![]() — Course Notes. Use this to communicate comments, instructions or notes to other team members who may be working on the same content. These notes are only for internal use within the OMS, they are not visible to SellPro users.
— Course Notes. Use this to communicate comments, instructions or notes to other team members who may be working on the same content. These notes are only for internal use within the OMS, they are not visible to SellPro users.
![]() — Activity Log. This keeps track of each status change applied to a Course. You can see what the last change was, who made the change, and at what time/date the change was made.
— Activity Log. This keeps track of each status change applied to a Course. You can see what the last change was, who made the change, and at what time/date the change was made.
![]() — Course Status. Use this menu to access the Course status change options.
— Course Status. Use this menu to access the Course status change options.
Below the status bar are the Content Steps, where you manage all the different components of the Course. All of the Content Steps must be completed before the Course can be activated. As you complete each step, a checkmark will appear next to that step in the list to indicate it has been completed. This is a safety feature of the OMS, and it's there to help you make sure that everything required to activate the Course is present.
When a Content Step is complete, a checkmark appears next to that step. Incomplete steps show an empty circle.
2. Assembling the Course
Course Details
First, enter some basic Course details like the title, description and product category. Some additional fields include:
-
Asset Tags. Add asset tags to the Course you’re building to use as filters in your analytics dashboards. This way, you can further customize your dashboard reports. For example, tags can be used to filter by product line, cost center, internal product department and more.
-
Re-certification Recurrence. This is an optional feature prompting SellPro users to re-certify on a Course on a regular basis — every 30, 60 or 90 days. We recommend that you use this feature for key products that you want to keep pushing, or for ever-green content, like the history of the brand.
-
Force Topic Order. Forcing the Course topic order will require a user to view the topics in the order they are presented in the Course. A topic will not be available to view until the previous topic has been completed.
Once you have finished entered all the details, select SAVE & EXIT ![]() . All of the Content Steps on the left are now unlocked, and they can be accessed in any order.
. All of the Content Steps on the left are now unlocked, and they can be accessed in any order.
Course Topics
In order to make the most of micro-learning, we recommend that the Course should take no more than 3-5 minutes for an average SellPro user to complete all the topics. This comfortably fits about 3 topics at about 1.5 minutes per topic.
For more details on how to use Topic types and file specification requirements, please refer to this article.
To add the first topic to the Course, select ADD ![]() under the TOPICS step.
under the TOPICS step.
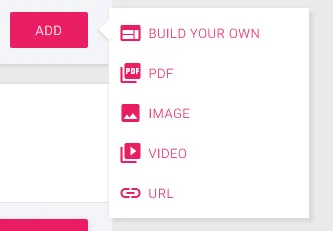
You can choose from a variety of topic types:
![]() — Build Your Own: Use this option to assemble a Course topic from scratch using the OMS Content Builder. In the form that appears, select the CONTENT BUILDER
— Build Your Own: Use this option to assemble a Course topic from scratch using the OMS Content Builder. In the form that appears, select the CONTENT BUILDER ![]() icon to launch it.
icon to launch it.
You can start by building your topic:
- From scratch,
- From a Favorites template you have previously created, or
- From a Course Topic that already exists in any other Courses you may have previously created.
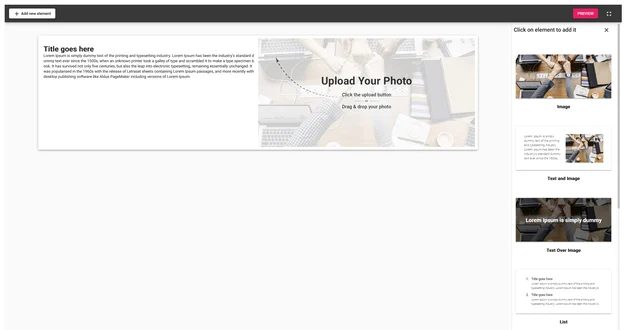
The layout view of the OMS Content Builder.
Drag and drop the different image and text layout elements in the menu on the left onto the canvas to build your topic page, and then fill in each element with your own content. Copy, Edit and re-order the element blocks in any way that you like. You can modify font style and color, background color, alignment, and padding for each element.
There is even an Interactive Graphic element, which allows you to add informational "pins" to an image that a user taking the Course can tap on in order to see more information.
After setting up the topic, select PREVIEW ![]() to view how the topic will look on different device screens.
to view how the topic will look on different device screens.
When satisfied with the preview, select SAVE ![]() to close the Content Builder. If you haven't already, fill in the remaining topic details.
to close the Content Builder. If you haven't already, fill in the remaining topic details.
The TIMER (SEC) option keeps the user from skipping through all of the topics without taking the time to actually read them. Set this to a length of time that it would take to read through the topic at a reasonable pace.
Select SAVE & EXIT at the bottom when finished to add the topic to the Course.
![]() — PDF. Use this option for pre-built content in PDF format, like documents or one sheets. Drag and drop the PDF file right onto the form to attach it.
— PDF. Use this option for pre-built content in PDF format, like documents or one sheets. Drag and drop the PDF file right onto the form to attach it.
To ensure compatibility with OMS, PDF files must not contain any embedded fonts, hyperlinks or interactive Javascript. Use Optimized PDF settings when creating your PDF, and remove all fonts and metadata.
You can upload PDF files with a maximum file size of 20 MB.
![]() — Image. Use this option to attach an image file as a topic. Drag and drop the image file right onto the form to attach it.
— Image. Use this option to attach an image file as a topic. Drag and drop the image file right onto the form to attach it.
You can upload JPEG, PNG, static/animated GIF, or BMP files with a maximum file size of 20 MB.
![]() — Video. Use this option to attach a video file as a topic. Drag and drop the video file right onto the form to attach it.
— Video. Use this option to attach a video file as a topic. Drag and drop the video file right onto the form to attach it.
You can upload videos with .MP4 file extension, with a maximum file size of 150 MB. Video files cannot exceed 5 minutes (30-90 sec recommended).
![]() — URL. If you would like to display a third-party website URL, this is where you can add it. Type or paste the URL into the designated field.
— URL. If you would like to display a third-party website URL, this is where you can add it. Type or paste the URL into the designated field.
When using the URL option, you must include the secure https:// prefix.
Teasers and Knowledge Checks
To add a little more interactivity to the Course, you can add Teasers and Knowledge Checks to each topic. Teasers and Knowledge Check questions work as “memory modifiers”, which are used to flag key information as something important that should be remembered.
Teasers appear before the topic begins. They're used to illustrate any knowledge gaps and hint at what the user is about to learn. You may add only one Teaser per topic, and they don't inhibit the user's progress - if they don't answer it correctly, they will see they were incorrect but they can still continue to the next topic.
Knowledge Checks are more like test questions - they appear after the topic, and they quiz the user on what they just learned. Unlike Teasers, Knowledge Checks must be answered correctly before the user can proceed to the next topic. If they get it wrong, they will have to review the previous topic and retake the Knowledge Check until they pass.
Knowledge Check questions can also be added to the Course and Award Quiz pools. This means that these questions can be selected to appear outside of the immediate Course topic, such as the Course Quiz at the end of the Course. They can also be used as part of an Award Quiz, which the user will see if they land on the associated Award in the PlayZone's Gravity Game. That could be days or even weeks after they first completed the Course, and if there's more than one Course attached to the Award, then the Award Quiz would include questions from those other Courses as well.
Considering all this, it's important to compose Knowledge Check questions that draw a direct connection to the focus of the topic they are written for.
They should be clear enough that the user can effectively recall the right answer in any context that the question is presented, not just within the Course topic itself.
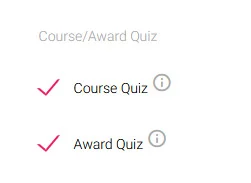
You can include Knowledge Checks as part of Course and Award Quizzes.
You may add as many Knowledge Check questions to each topic as you like - in fact, you can randomize the Knowledge Checks that appear each time the topic is viewed simply by adding more of them to the same topic. Only one question gets asked each time the topic is viewed, so having more than one means they'll be randomly selected each time.
Add a Teaser or Knowledge Check to a topic in one of two ways:
-
Select one of the options under the Topic Info form.
2. Select one from the Edit menu in the Topics Content Step.

Then, choose a Question Type.
-
Radio. The user can only select one answer.
-
Checkboxes. There can be more than one correct answer, and the user can select multiple answers to the same question.

Fill out the question and all the possible answers. Then, highlight the Correct option to the left of each of the correct answer(s).

Enter the question and answers, then indicate the correct answer using the radio buttons or checkboxes to the left.
Both Teasers and Knowledge Checks have Response fields. This is where you can enter your own custom response "correct" and "incorrect" texts that the user sees when they answer the question. For Teasers, you are required to enter these responses. For Knowledge Checks, you have the option to either use the Default Response options, or fill in your own.
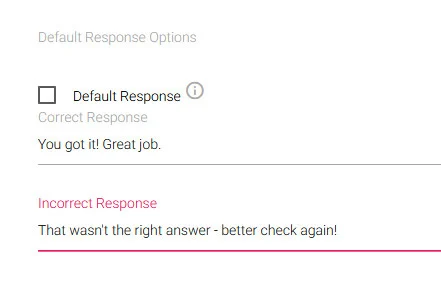
The response fields for a Knowledge Check with custom text. Check the box if you wish to use the system default responses.
After you have finished adding topics, the next step is to build your Quiz Questions bank.
3. Quiz Questions
Quiz Questions are vital to the SellPro learning process. They reinforce the most important things to take away from the Course, and they serve as the challenge that makes the incentivized process work.
Users have to pass the Course Quiz at the end of each Course so they can earn the SellPoints they need to play for awards in the PlayZone. If they land on an unlocked award that is attached to this Course when playing the Gravity Game, they will also have to answer some of these questions during the Award Quiz that they must pass in order to claim it.
To build Quiz Questions, go to the Quiz Questions step.
![]()
The Quiz Questions step. Preexisting Knowledge Checks appear at the top.
Knowledge Check Questions
If you've already added any Knowledge Checks, they'll appear at the top. Knowledge Checks are arranged and separated by topic, so if you added them to more than one topic, you'll see a separate block for each topic's set of Knowledge Checks.
If you'd like to add more Knowledge Checks to one of the topics already listed here, select EDIT ![]() . To add a Knowledge Check to a topic not already listed, simply exit the Quiz Questions step, return to the Topics step, and add them to the topic. The new Knowledge Check question will appear in the Quiz Questions step when you return.
. To add a Knowledge Check to a topic not already listed, simply exit the Quiz Questions step, return to the Topics step, and add them to the topic. The new Knowledge Check question will appear in the Quiz Questions step when you return.
Required Questions
You may mark Knowledge Check and Course Quiz questions as required so they always appear in the Course Quiz. This option ensures that critical content is consistently covered in every course. To mark a Quiz Question as required, simply select "Required for Course Quiz" in the settings.
Additional Questions
You may add more questions that are reserved exclusively for the Course and/or Award Quizzes in this section. Questions added here are created the same way as Knowledge Checks and Teasers are, but they will only appear during the Course Quiz, and not during any of the Course topics.
Important: After you've added or modified your question bank and exited the Quiz Questions step, you may notice that an empty circle still appears in this step. This means the step is still incomplete, so return to it and scroll down the form. You'll see there is a Course Quiz Length section that needs to be filled in before the step can be completed.
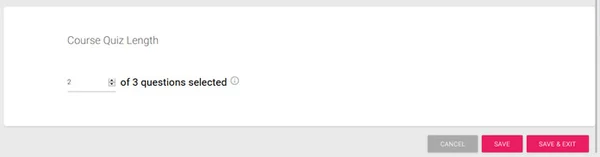
Course Quiz Length
Use this option to indicate how many of the questions listed will be used in the Course Quiz. When a user takes the Course Quiz, they are presented with a selection of questions pulled from the total Quiz Question pool. If the number entered here is less than the total number of questions in the pool, then the questions will be randomized by the system to optimize content retention.
4. Visibility
Visibility settings determine who will see your content when it is activated in the SellPro app.
First, select the desired Country where you want to expose the Course. You can select from all of the countries your brand has access to.
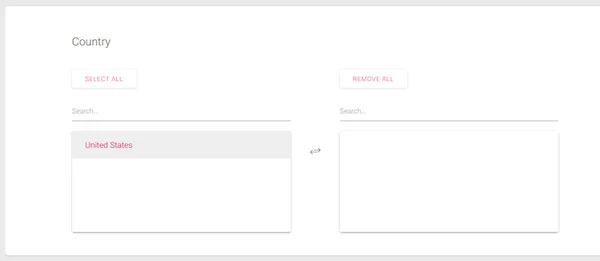
Sales Associate Visibility determines if the Course is visible to retail personnel. If the box is unchecked, then no retailers can be selected - this means the Course will only be visible to your brand's internal field force. If you want your content exposed to retailers, keep this box checked and select the retailers you want. To maximize course exposure, we recommend selecting as many retailers as possible where your content is relevant.

You must also select the States where you want the Course exposed. Keep this option checked to include all states and provinces by default.
When finished, select SAVE & EXIT.
5. Awards
After completing all of the other Content Steps, an Awards step will then appear at the bottom of the Content Step list. This is the last step you must complete in order to activate your Course.
Once you open the Awards step, you'll be presented with a list of all your available inventory.You can attach as many Awards to the Course as you like, provided you have the available inventory.
Important: In order to attach an Award to the Course, Inventory will need to have already been purchased and set up in the OMS under the Inventory section. If you don't see the inventory item you're looking for in the list, check with your Brand Administrator.
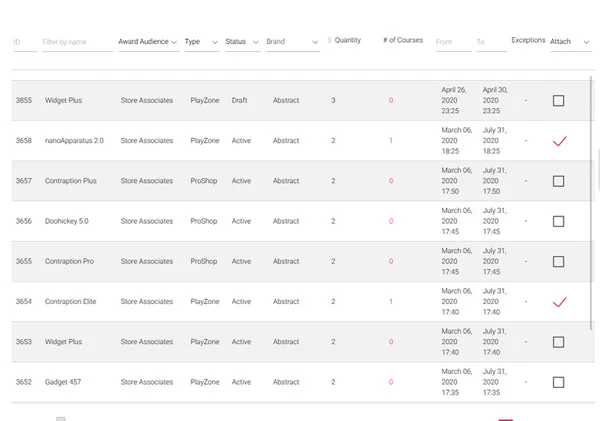
The list of available awards in your inventory. You may attach any number of awards to a single Course, and an award can be attached to any number of Courses.
To attach award(s) to the Course, check the checkbox next to each desired award.
Once you've finished, select DONE ![]() . The awards you've selected will then appear in the Awards step.
. The awards you've selected will then appear in the Awards step.
6. Review & Approve, Activate
After all Content Steps have been completed, you may use the Status menu to submit your Course for Review, which is required before the Course can be approved for activation. For detailed information on each status and how they work, see the Interface / Getting Started section at the beginning of this document.
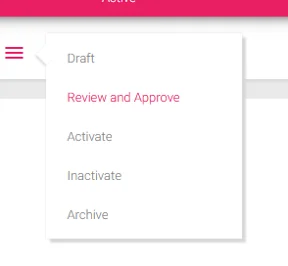
The Status menu and available status options.
Once the Course has been sent into Review & Approve mode, you are presented with an in-browser preview of the Course. During this process, you must review the entire Course to ensure everything appears as expected before launch. This preview is designed to give you an accurate look at what SellPro users will see when they go to take the Course.
Proceed by reviewing all of the topics, answering all Teaser and Knowledge Checks, and completing the final Course Quiz to test out your Course. You no longer have to certify in order to approve the Course, and the Review can now be done entirely within the OMS without have to use a device, however you must go through the entire Course including answering all of the Quiz questions (whether correctly or incorrectly). Once you have completed your review, then select the APPROVE button in the lower right corner.
Full Preview: When this feature is turned on, reviewing the Course will show you ALL Teaser, Knowledge Check and Additional Questions you have created for the Course (the value entered in the Course Quiz Length will be ignored). This is to ensure that all possible questions get equally checked. When this option is turned off, the Course preview will only show the number of questions selected in the Course Quiz Length, similar to the way an actual SellPro user would see the Course in-app.
You can preview the course using three different device screen sizes: phone, tablet (portrait) and tablet (landscape). Simply choose the device orientation using the icons below Full Preview.
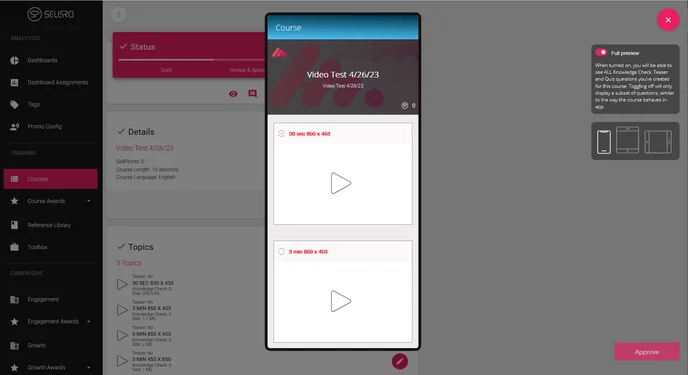
The in-browser Preview mode.
Once the Review is complete and the Course has been approved, it can be activated. Once Activate is selected, the Course immediately goes live to SellPro users, and they will receive a notification in the SellPro Feed that the Course is available.
If you want to remove an active Course from the SellPro app, select INACTIVATE from the status menu.
You also have the option to archive inactive Courses, which means they will not appear in the main Course list view unless the ARCHIVE filter is selected.
7. Best Practices
Follow these tips to ensure your content takes full advantage of the micro-learning strategy, and is as accessible and engaging to SellPro users as can be.
Course Basics
- The recommended length it should take to complete a single Course, including all topics, is between 3-5 minutes.
- Each topic in a Course should take users one minute or less to complete.
- Use short, precise bullet points rather than long sentences or paragraphs to reinforce important information. Doing this helps users easily understand what the key takeaways are from the topic.
- Use Asset Tags to more efficiently and accurately identify your Course for reporting purposes. You can create custom tags or select from an existing list, then add them under Course details. The tags you add will be available in a custom filter when you view the Course's associated Dashboard in OMS.
Content Builder
- The recommended length of a topic composed in the Content Builder should take no more than three vertically-oriented screen scrolls to reach the bottom.
- When including images, it is recommended that you use images with little or no text. Images containing too much text, or very small text, may become difficult to read on some mobile devices.
Recommended Process for Course QA
- First, review the Course using the OMS preview. In this step, make your initial review of the copy (content, teasers, knowledge checks and quiz questions), and the content format. Remember, the OMS preview isn't an exact match to how it will look on various mobile devices. To see more accurate display on different devices, you may test the Review on physical devices as well by logging into your Approver account on the device(s) while the Course is in Review mode. Test using different devices, such as iOS, Android, and Windows.
- After the Review is approved, select APPROVE to approve the Course for activation. Approvers will receive as notification that the Course is ready to be launched.
If you need to make any changes to a Course AFTER it has been activated
- Inactivate the Course.
- Create a copy of the Course.
- Make sure to update the Course title. The title will automatically default to "Copy" in the title, so remember to change it before you save the copied Course.
- Make any necessary edits to the Course and follow the same Preview/QA/Activate process to Activate it.
- The copied Course will appear as a new Course in both in SellPro app and in your OMS dashboard analytics.
Course Visibility
- If your content is not retailer-specific, then it is recommended that you expose each Course to as many of the retailers that your brands sells into as possible.
Course Quiz
- It is recommended that you create a Quiz Question pool with a total larger than the number of questions you have set to appear in the Course Quiz, in order to optimize randomization. This way, the chances are higher that users will see different questions each time they take the Quiz.
Award Quiz Questions
- Remember, when building Knowledge Check questions used for Award Quizzes, it's important that the question contain enough context for the user to be able to answer it when it's viewed outside the immediate Course. An Award Quiz question should always directly reference the product, features, etc. referenced in the original topic.
- Good example: "The nanoApparatus 2.0 comes with which optional accessory?"
- Bad example: "It comes with which of these?"
Video Topics
- For best results and to ensure full compatibility, please follow these specifications:
- Video
- Video resolution: 1280 x 720 px / 720 x 1280 px
- Video file type: MP4
- Video frame rate: 30 fps
- Video bitrate: ~ 2 Mbps
- Audio codec: AAC-LC
- Audio channels: 2 (stereo)
- Audio bitrate: 192 Kbps
- Max file size: 150 MB
- Audio
-
AAC audio codec
-
48kHz Sample rate, 192 Kbps
-
Stereo
-
- Video
-
Adding burned-in subtitles is a great way to ensure users are able to watch and understand them, even if they need to have their phone in Silent mode. Add the subtitles to your video before you upload it to the Course in OMS.
Want to learn more about how to use SellPro's Online Management System to create awesome training and brand awareness content for retail personnel? Check out more articles in the SellPro Client Guide.
Was this article helpful?